The Great Bee Count of 2011

Honeybee on lavender flower

Honeybee on lavender flower

The day has arrived – so go out to your yards and gardens and begin …. counting bees!  The Great Sunflower Project  was launched in 2008 to get information about urban, suburban and rural bee populations.  The Project also wanted to educate people about what was happening with the bees in their back yards, and to remind us of how important bees are — their motto is: “Bees: Responsible for Every Third Bite of Food.”   So they got people all over the world to observe their bees on Lemon Queen sunflowers, because sunflowers are relatively easy to grow and a great resource for bees. They expanded the list of plants, including bee balm, cosmos, rosemary, tickseed, goldenrod and purple coneflower.  But even if you don’t have any of those plants in your garden (yet — lots of time to prepare for next year!) you can still count.  The bees that come to our garden love the lavender, and I had a blast earlier this week taking photos of them.

Bumble bee on soap plant flower

Bumble bee on soap plant flower

The bumble bees also love the soap plant flowers (Chlorogalum pomeridianum), tiny, spiky flowers that bloom only in the evening. The flowers are only about an inch around, so watching the relatively large bumble bees (compared to honeybees) grab onto the delicate flowers, making them bounce and wave, is very entertaining.


The steps to participate in the Project are listed on their site, with links.  All you have to do:  sign up and plant your sunflower (or other plant); describe your garden; watch the plant for 15 minutes and enter the data online. With colony collapse disorder, pesticides, and other threats to the hardest-working pollinators, every little bit helps —

Even if you don’t have any of the listed plants yet, why not go outside and do the count anyway? It would be a good baseline to compare with the number you get next year, when you’ve filled your garden with plants to help the bees.  And let me know what you find!

Anise swallowtail butterfly from 2006!

I think I’ve mentioned here before that anise swallowtail butterflies don’t emerge from their chrysalises on a set timetable, like monarch butterflies do. George thinks that it’s probably to ensure better survival, so some of the adult butterflies will emerge pretty quickly – in a couple of weeks, but others hang out for much longer.  You can tell that they’re still alive by touching them gently – they move.

This photo collage I did for the butterfly exhibit in the El Cerrito Library shows the caterpillar getting ready to become a chrysalis (pupate) – that’s the top left. The bottom left and top right show how different the chrysalises can look, some bright green, and some drab brown. The bottom right one shows what the empty chrysalis looks like after the adult butterfly emerges. Anyway, we were so excited to see that the beautiful female that emerged today became a chrysalis way back in 2006!

She must have come out sometime during the night, because she was ready to go this morning. Since the weather is so nice, we put her outside on a yampah plant, that’s the native larval food source for anise swallowtails. While she was resting happily in the sun, I got this photo of her from the side, showing her head, including her eyes, proboscis (that’s what they sip liquid food through), and antennae.

We always hope that the females we raise and release will remember the plant and come back to lay eggs, so we can continue the cycle.

Pitkin Marsh Lily

George grew this magnificent lily from seed that he got at the seed bank at the Tilden Park Botanic Garden in Berkeley. The flower bloomed today. A couple of days ago it was curled up tight:

The Pitkin Marsh lily, or Lilium pardalinum subsp. pitkinense, is an endangered perennial in the Liliaceae family. George tells me that there is a dispute about what family to put it into, that some think it should be with the leopard lilies. The individual flowers are relatively small, but the entire plant is tall, and filled with blooms and flowers.

According to Wikipedia, the habitat has been greatly reduced mostly due to cattle overgrazing, and partly because of collectors seeking it for its rarity and beauty.

The Tilden Botanic Garden sells plants and seeds at the Garden’s Visitor Center on Sundays and Mondays from 8:30 a.m to 5 p.m., at the Garden’s fall lectures, annual spring plant sale, and often at plant sales and fairs of the East Bay Chapter of the California Native Plant Society.

Vanilla orchids by George

Did you know that vanilla (the real kind, not imitation) comes from an orchid flower?

Vanilla orchid flower

Vanilla orchid flower

My amazing husband George grows vanilla orchids, cultivates vanilla beans from the flowers, and makes extract from the beans! I’m going to track the steps, beginning with the orchid flowering, through pollination and cultivation of the beans.  I’ll add photos along the way, since the entire process takes more than a year (and you wondered why real vanilla costs so much) …

The vanilla orchid grows on a vine.  It helps to have a lot of space, but George set up a trellis, so the vine winds up and down and around.  Here’s a photo of George’s helper, Lars, watching the vanilla grow..

The first step of the process: the flower.

This is one of the flower buds, as yet unopened. You can see a drop of nectar – so sweet! I’m not sure what the purpose of the nectar is, some think it may be there to attract ants, which would protect the flower.

This is one of the flower spikes on the vanilla plant. There are five separate flower buds, unopened, on this one spike. There are at least four other flower spikes on the plant.  Finally, one of the flowers opened!

Unlike many other orchids which have flowers that can last for a month or more, each vanilla flower only blooms for one day.  If you want to cultivate the vanilla, you have to pollinate the flower before it fades.  The natural pollinator isn’t present in most places, so it’s usually necessary to hand-pollinate vanilla.  It’s not easy to do, but George has a really good success rate.  He takes a wooden stick and transfers pollen from one part of the flower to another (the anther to the stigma).

Hand pollinating the vanilla flower

Hand pollinating the vanilla flower

This is the flower, immediately after pollination.  You can see the other unopened flower buds on the spike.

After a short time, the flower collapses.

Stay tuned for more … next, the flowers that were successfully pollinated will develop into beans ..  If you want to learn more, there’s a great wikipedia entry on vanilla.

Butterflies emerging!

What a celebration we had for the first beautiful warm day after a horrendous stretch of pounding rainstorms, hail and cold — two of our swallowtail butterflies emerged!

Anise swallowtail butterfly

Anise swallowtail butterfly

Number one came out in the morning.  He’s an anise swallowtail butterfly that we raised from an egg we found on fennel in our garden.  We let this guy sit inside for a bit, then after his wings had firmed up, we opened the cage and away he flew.  Anise swallowtails are interesting, because they don’t emerge according to a set timetable (as monarch butterflies do).  The swallowtails stagger their emergence, possibly to insure that some of them at least emerge at a time when there will be plenty of food for them.  We have some swallowtail chrysalises in our butterfly nursery that date back more than 2 years.

Swallowtail chrysalis

Swallowtail chrysalis

You can tell they’re still viable because there’s movement inside if you touch them.  After checking some of them, George noticed that another chrysalis had darkened, which they do when they’re getting ready to emerge.  And shortly after that, number two came out!

I only got a few shots of these guys, but if you want to see my photos of the life cycle of the anise swallowtails, go to this gallery in my smugmug website.  I have closeup shots of the entire process — from egg, to caterpillar, to chrysalis, to butterfly.  Oh, and we haven’t seen any monarch butterflies in our yard yet, and we don’t have any of them in our butterfly nursery, but you can see my photos of the life cycle of the monarch butterfly at this gallery.  Happy Spring!

Garden Delights Arts and Crafts Open Studio!

I’ve been happily scrambling to get my messy workroom presentable for my holiday Open Studio and Gift Sale.  And amazingly, it was pretty much all in place by the time the first visitor showed up!  My friend Pam always comes on my first day, and gets her pick of the calendars that I print using my images.  She took most of the calendars I had made, I’ll need to do some printing tonight.  There was a lull after she left, so I kept busy taking photographs of the spruced-up studio.

This is the view when you come in the door:

The card rack is to the right.  You can see some of my framed mandala prints hanging to the left above.  The table to the left is in the middle of the room.  This is what’s on that table:

My mixed-media doll “Wings” is in the center.  Pet collars to the left (kitty collars hanging from the Lars stuffed animal).  My fabric-covered light switch plates are displayed in front of the doll.  This is a closeup of the pet collars display:

Just to your left inside the door is a shelving rack:

The top shelf has a night light, a transparency print in a frame and one of my fabric vases.  The second shelf down has a display of ornaments, including glass balls with mandalas and other designs printed on backlight film or transparencies, along with a dusting of glitter, some mandala sachet ornaments with pearl hangers, and my stuffed animal ornaments – some with squeaky toys inside!

In the photo above you can see what’s past the center table along the back wall — a hanging display with several of my purses, t-shirts, scarves, and baby onesies.  To the left, a rack with a fabric vase, my bowties, mixed-media handmade books, my Kaleidoscopes book, some coffee mugs I ordered from my Zazzle store, and a tile box.

Above is a closeup of that rack.  The piece at the bottom is an accordian of watercolor paper, with four of my abstract collages printed on lutradur and mounted.  I strung pearls across the top and bottom.  The bowties are jauntily hung just above that piece, on a jewelry bust.

The table above is to the right just past the card rack.  From left to right: purses, wooden postcards, fabric bowl, buttons, fabric vases, fabric postcards, and some night lights.  I love to use vintage pieces as displays.  On this table I’m using two old silverware boxes, sturdy wooden boxes lined with velvet.

To the back wall again, above is a display of the different kinds of boxes that I make.  First, the blue – I printed my mandala of a blue girl rose onto fabric,  quilted it and placed it into the recessed top of a wooden box.  The box to the left of that is one of my favorite tiles.  It’s a kaleidoscope design in rich deep browns, very craftsman style.  I make most of my own work, but some things I do have printed professionally.  This is one of the tiles that I have Tony at Changeyourart make to use as the tops of wooden boxes that I get at Aftosa.  The two small tiles in front of the blue girl rose box are ones that I made myself using lazertran on tumbled marble tile.  It’s a hard technique to master, and I often end up scrapping my creations, but I love how these mandalas turned out.  To the left of those tiles are some glass slide pins I made using my photos printed on velvet fine art paper or canvas, and encased in microscope slides that I outlined with copper tape.  Behind the brown tile box are two more boxes I made using lazertran.  The front one is a kaleidoscoped photo of a calla lily, and behind that is my kaleidoscope design of a fern arching.  For that box, I encased the top edges with copper metal.  To the left  is another tile box of my Lisianthus Flower design. Finally, the box at the far left is one of my favorite pieces.  I used the double exposure photograph that I took of myself and adhered it to the box using a heat transfer.  I embossed some copper and used the strips at the top and bottom edges.  I also made a dangle from pearls and glass beads, and with metal brads on mesh spelled out “treasure”.  Inside the box, I printed the same double exposure image onto silk and used batting to make it a soft pad on the inside top.

Past the boxes is more jewelry.  I have some hanging displays for earrings and bracelets.  Before I began my photo arts work, I used to make jewelry from pearls and beads, and I still love to do that.  The vintage jewelry box at the front right holds my lutradur butterfly earrings.  I take the photos of butterflies that my husband and I raise and release, and print my designs from the photos onto lutradur that I’ve coated with Digital Grounds.

Next a view of the other side of the middle table.  At left, a pile of my tote bags, which I make by printing my images onto fabric and sewing them onto the totes.  I used to make them with iron-ons, but I much prefer the fabric.  Most of them I back with batting and then do some free-motion quilting.  To the right is another vintage jewelry box that I’ve piled with my original design fabric jewelry.  There are fabric bracelets with snaps and buttons, sachet-lets, and my sculptural braided fabric bracelets.

Turn around to see a plush pile of my pillows:

Next, a view of my barely disguised supply shelves.  I don’t really try to turn it into a display, I usually just put some of my work in front of the supplies:

And finally, I covered our washing machine with a delightful vintage fabric, and used it to show off a variety of things:

The soaps that my husband George makes are displayed in front and in the basket at the top left.  He makes the most wonderful soap from natural ingredients using an assortment of molds.  His most popular is the mold of a curled-up sleeping kitty, and close favorites are a butterfly and hummingbird.   He makes a variety of soaps, both cold process and melted.  To the right is a basket of sachets that I make from my fabric, which I fill with heavenly lavender flower buds (and some with rose buds).  The backs of the sachets are gauze, so you can see the flowers.  Behind the sachets is a  basket with catnip bags.  I use the strongest catnip I’ve found, Cosmic brand, and put various fun animals photos printed onto fabric on the front.  When I do Open Studio the cats are forbidden from coming down here, because they’d make a beeline for the catnip bag display and wreck the merchandise (yes, I know this from experience).

Tomorrow if I get a lull I’ll take you on a tour of the art that’s hanging on the walls … Come on by to see it yourself if you’re in the Bay Area!

Big dogs little dogs!

I’m a cat person.  Hey, guess what my astrological sign is?  Yep, I’m a Leo.  And from the first kitten I begged my parents to get (who I named Button, for the spot on the top of her white head), I’ve rarely lived without a cat (or two, or three…).   Don’t get me wrong, I really like dogs.  But when my husband George and I see a really cute dog, we call it a “kitty pup” …   Anyway, you know from my previous blog post that I just started making pet collars from the fabric that I design.  The cat collars came first, of course.  I made this soft sculpture to display the collars from a photograph of our cat Lars.  I lengthened his neck a little so more collars would fit on … a bit of artistic liberty thanks to Photoshop.


Lars soft sculpture with collars galore

Lars soft sculpture with collars galore


But guess what? There are a whole lot of dog people out there who want collars for their pups!  And boy, are they different from cat collars.  First, the breakaway clasp that I use for the cat collars (so they can release if they get stuck on something while they’re being bad cats) don’t work for dog collars.   You need the dog’s clasp to hold so when the collar is attached to a leash it won’t release.   And another thing that’s different between cats and dogs — cats vary in size a bit, but oh my … you’ve got your mini-sized dogs and you’ve got your jumbo-sized dogs!  So yesterday I made one collar for a mini-dog (an adult dachshund whose neck is 11.5 inches) and one for a jumbo-dog (a Lab puppy whose neck is already 18.5 inches).

Monarch peacock fabric dog collar

This is the large collar.  The fabric is one of my new designs. I took my photos of a monarch butterfly wing and a peacock feather and blended them, then kaleidoscoped the blended image.  I had the fabric printed by spoonflower.  The collar is easily adjustable for when the puppy grows.  The person who wanted the collar taught me something else — some dogs chew up their dog tags (I don’t think even bad cats do that).  Hence, the invention of slider tags.  The tag slides right onto the collar – before it’s sewed up, of course.  You can’t add the slider if you buy this kind of collar ready-made (another reason to make a custom order, hint, hint).  I ordered the slider pre-printed.  Here’s a photo of what the slider looks like (the printing’s nice, I blurred it here):


Dog collar  with slider

Dog collar with slider


Here’s the small collar.  Because the dog is full grown, I didn’t leave much extra length, but it is adjustable to add about an inch.


Small pup collar

Small pup collar


And here … a stack of dog collars!


Dog collars

Dog collars


And for fun, this is the tag I designed for my dog collars.  The model is Scout, who lives with my brother and his family.

I’d love to make a collar for your pet out of any of my fabric designs.  If you’re interested, just email me at HeidiRand@gmail.com  Click here to see some of my fabric designs.  I can also make a custom collar using your photographs or images.

Click here to see the cat collars listed in my Artfire shop and click here to see the dog collars.

This Sunday! Celebration of Old Roses

Is your garden exploding with roses like ours?  We have the most intoxicating roses climbing the fence (Sally Holmes), draped over the trellis (Ispahan), peeking around the orange tree (Double Delight), trying to hide from the deer (Blue Girl), climbing up the willow tree, and just blooming gloriously (Graham Thomas, Butterscotch) …..

Blue girl rose kaleidoscope

Blue girl rose kaleidoscope

So timing couldn’t be better for the yearly Celebration of Old Roses, sponsored by the Heritage Rose Group, and held the Sunday after Mother’s Day.  This year the Show will be this Sunday, May 16th from 11 am to 4:30 pm.  It’s at the El Cerrito Community Center, a few blocks east of the main drag in El Cerrito, San Pablo Avenue.  The Center is at 7007 Moeser Lane, cross street is Ashbury.  The event and parking are free.

Butterscotch rose

Butterscotch rose

The heart of the event is the hundred-foot display of roses — everyone from expert cultivators to garden-fanatics to hobbyists to people who just have one rose bush in their yard bring cut roses to show. They are grouped and arranged, and the result is an intoxicating display of scents and colors. So pull out your shears,clip off a couple of your best roses, and bring them by!  Have a rose that you can’t identify?  Bring a bloom in and get an expert’s opinion…

Sally Holmes rose

Sally Holmes rose

In addition to the roses, an array of arts and crafts and rose-related products will tempt you — just view, or  purchase if you can’t resist!  My favorites include a vendor who sells rose and nature themed books, and two vendors who offer rose flavored jellies and jams and  locally-produced honey.

Garden Delights display

Garden Delights display

I have had a booth with our artwork and crafts at the Celebration for the past five years.  This year I’m going to be in the main hall again, competing with the rose display for attention.  I’ll bring the work that I make from my original photographs, mostly rose and flower-related, including jewelry, scarves, tiles, boxes, vases, sachets, and much more!  Go to smell the roses, then stop by to say hello…

If you have any questions about the Show, please email me at HeidiRand@gmail.com

Heritage Rose Show – May 16, 2010

Despite the cold weather, I’m getting signs that spring can’t be far off.  The farmer who sells incredible tomato plants at the Civic Center Farmer’s Market had a bumper crop of starter plants yesterday, so after consulting with family gardener George I toted six plants home on BART.   And just as exciting, I got news yesterday about one of my favorite events in our town (El Cerrito California, a bit north of Berkeley) — the Celebration of Old Roses, sponsored by the Heritage Rose Group, and held the Sunday after Mother’s Day.  This year the Show will be on May 16th from 11 am to 4:30 pm.  It’s at the El Cerrito Community Center, a few blocks east of the main drag in El Cerrito, San Pablo Avenue.  The Center is at 7007 Moeser Lane, cross street is Ashbury.  The event and parking are free.

Double delight rose

Double delight rose

The heart of the event is the hundred-foot display of roses — everyone from expert cultivators to garden-fanatics to hobbyists to people who just have one rose bush in their yard bring cut roses to show. They are grouped and arranged, and the result is an intoxicating display of scents and colors.

Blue girl rose mandala

Blue girl rose mandala

In addition to the roses, an array of arts and crafts and rose-related products will tempt you — just view, or  purchase if you can’t resist!  My favorites include a vendor who sells rose and nature themed books, and two vendors who offer rose flavored jellies and jams and  locally-produced honey.

Rose and bouquet collage silk scarf

Rose and bouquet collage silk scarf

We have had a booth with our artwork and crafts at the Celebration for the past five years.  This year we’re going to be in the main hall again, competing with the rose display for attention.  I’ll bring the work that I make from my original photographs, mostly rose and flower-related, including jewelry, scarves, tiles, boxes, vases, sachets, and much more!  Go to smell the roses, then stop by to say hello…

Garden Delights booth at Rose Show

If you have any questions about the Show, please email me at HeidiRand@gmail.com

Despite the cold weather, I have been getting signs that spring can’t be far off.  The farmer who sells incredible tomato plants at the Civic Center Farmer’s Market had a bumper crop of starter plants yesterday, so after consulting with George, the family gardener, I toted six plants home on BART.   And just as exciting, I also got news yesterday about one of my favorite events in our town (El Cerrito California, just north of Berkeley) — the Celebration of Old Roses, sponsored by the Heritage Rose Group, and held the Sunday after Mother’s Day.  This year, 2010, the event will be on May 16th from 11 am to 4:30 pm.  It’s at the El Cerrito Community Center, a few blocks east of the main drag, San Pablo Avenue.  The Center is at 7007 Moeser Lane, cross street is Ashbury.  The event and parking are free.

Inkjet Heat Transfer Techniques : One-day workshop

Learn to make creative and unique artwork, crafts and gifts using heat transfers and your inkjet printer. We will explore several products and techniques to transfer images and text to a wide variety of surfaces. You will complete at least two transfers at the workshop.

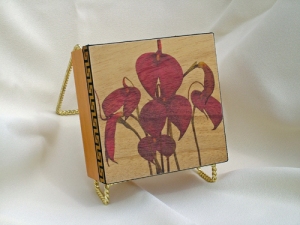
Masdevalia orchid box

Masdevallia orchid box

Sunday February 21, 2010, noon to 4.  Canyon Trail Park & Art Center, 6757 Gatto Ave., El Cerrito. $40 plus materials

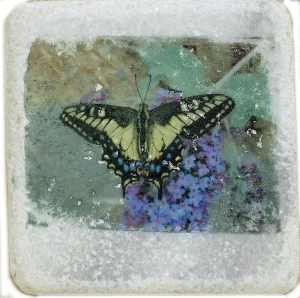
Swallowtail butterfly tile

Swallowtail butterfly tile

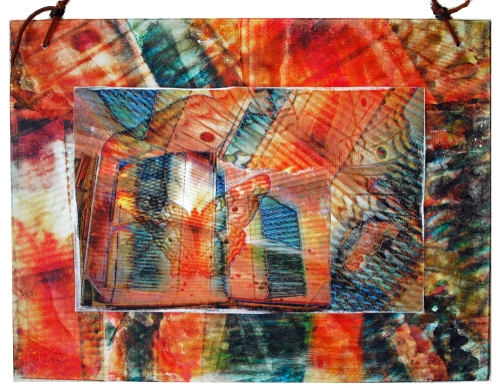
You can use heat transfers on fabric, wood, tile, metal, and many other surfaces.  It’s a versatile way to place your photographs and images onto things that you can’t fit through your printer!  For best results, I usually recommend using the  iron-on transfers that your printer manufacturer offers.  There is an exciting new product though, Transfer Artist Paper (TAP), that works very well for transfers.  You’ll have a chance to try TAP at the workshop. I made the frame for this lutradur piece with TAP transferred onto a canvas board.

Butterfly window collage lutradur and TAP

Butterfly window collage lutradur and TAP

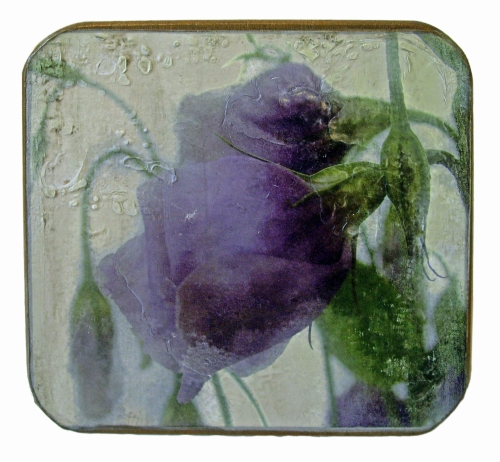
Another heat transfer product I like is by Lazertran, the company that makes the waterslide decals that I use in many of my art pieces.  The top of this box is a lazertran heat transfer.

Lisianthus box heat transfer

Lisianthus box heat transfer

Here are some of my blog posts about using heat transfers:

Photos on wooden boxes, part 1

Photos on metal, part 1

Photos on tiles, part 1

For more information, or to pre-register, email me at heidirand@gmail.com.   For the complete list of my workshops and other events, go to the Calendar on my website.