Joss Paper Print

A friend gave me a fat package of Chinese  Joss paper for my birthday. I’m sure you’ve seen the paper before – it’s very popular with collage artists. This scan doesn’t show the wonderful shine of the gold in the center.

Joss paper

You know my first thought: oooh, what am I gonna print onto that!? In printing on any new surface there are a few things to figure out. First, is this stiff enough to go through my printer without a backing? If not, I’d tape it onto a sheet of typing paper. Second, will the quality of the print be good enough? If not, I’d treat the surface with an inkjet coating like inkAID or Golden Paint’s Digital Ground.

I always try the quickest and easiest way first, which is to send it through the printer without coating it, and without a backing sheet. Then the fun part, figuring out what kind of image will work on the surface. I chose this new photo-painting I did of a stunning ladyslipper orchid that George grew for me.

Ladyslipper orchidI slid the paper into the printer and crossed my fingers that it would be sturdy enough not to crumple up. Phew — it went through with no problem at all!

Joss paper ladyslipper orchid

I like the effect – the background really dropped out, leaving mostly just the flowers and the dark border. The quality of the print could be improved by coating it with inkAID or Digital Grounds, but I was surprised at how close the color is, and the fact that it’s not as sharp as the original doesn’t really matter for this image, I think. I shot a photo holding it sideways to catch more of the glimmer of the gold. The fact that the border of the image lined up almost exactly with the edge of the gold was a lucky accident. I estimated where to place it, but didn’t measure exactly – which I would do for a more planned-out piece.

Joss paper ladyslipper orchidThe package my friend gave me also has some sheets with silver in the middle, so I’ll try that next! What creative projects are you working on these days?

Inkjet Printing on Fabric

I mailed one of my new no-sew fabric postcards to a Postcrossing friend in Italy. In her profile she talked about her passion for creating handmade things including sewing and découpage, and said that she’s always looking for new techniques. 
Wood hyacinth fabric postcard

Wood hyacinth fabric postcard

When she got the postcard she asked for the link to my blog to find out more about printing on fabric. I found an old post that gave an overview but not much concrete info, and it’s high time for me to give you a full-fledged post with the basics of my favorite art process. After you read this if you’re itching to learn more, please check out my Inkjet Printing on Fabric ebook or online workshop.
Printing fabric
Printing on fabric with your inkjet printer isn’t hard, but knowing a few things before you start will save you lots of time and money. There are two main components: your printer and the kind of ink it uses, and the fabric you’re printing on.
First: inks. To get the lowdown on the difference between dye and pigment inkjet inks and why that matters in printing fabric, go on over to CraftArtEdu to watch my free basic workshop about inkjet inks. Or here’s the really quick version: dye inkjet inks are not colorfast or waterfast, so they fade over time and run when exposed to moisture. Because pigment inks are colorfast and waterfast, they are by far the best option for printing on fabric.
Fabric printing color shift dye ink

Dye ink prints: colors fade and shift

Second – you need to choose what kind of fabric to print: (1) untreated, (2) fabric that you treat yourself, or (3) pre-treated commercial fabric. There are pros and cons for each, and what you want to use the fabric for is a factor, but in this post I’ll tell you about commercially pre-treated fabrics, because they’re the most versatile and give the best results for most purposes.
Untreated vs pre-treated fabric

Untreated vs pre-treated fabric

Pre-treated fabrics are backed with paper or plastic to stiffen them so they’ll go through your printer without crumpling up and jamming your printer. You want the fabric sheet as flat as you can get it so the edges don’t catch as the printer heads go back and forth, which can make the fabric shift or leave ink on the edges.

Fabric shifted in printer

There are a lot of different ways to flatten fabric — some tips: try curling it the other way by hand, flattening the sheet under a stack of books, or ironing it.

With so many pre-treated products to choose from it’d get expensive fast to sample them all to find the ones that work best for you. I advise starting out with a few that let you buy small quantities so you can test and compare. I’ve tried most of them, and my favorites for printing with pigment inks are Cotton Satin and Cotton Lawn by EQ Printables. The fabric feels wonderful and the quality of the print is great. In my opinion the plain EQ Printables (the package says only “Inkjet Fabric Sheets”) is not worth the money, so make sure the packages are either the Cotton Satin or Cotton Lawn. I also like June Tailor’s Colorfast Sew-in Inkjet Fabric. It’s stiffer than the EQ but the print quality is great and the stiffness can be ideal for certain projects: I use it for some of my fabric postcards and a lot of my home decor creations like fabric vases and bowls, covered light switch plates, etc.

Fabric vases

Fabric vases

After printing all you have to do is remove the backing from the fabric sheet. If you’re using pigment inks there’s no need to heat set or wash; you can use it right away in your sewing or other art projects. However, even though the fabric will feel dry to the touch, it actually takes quite a while for pigment inks to thoroughly dry. If you don’t need to use the fabric right away you’ll get best results by putting it aside for a week or so.

That’s it for the basics! If you want to learn more this is the link to my blog post about my ebook “Inkjet Printing on Fabric.” My website has a page with links to all of the different options to find my ebook, including the kindle version where you can see a preview of the book.

 Or click here to go to my online workshop on CraftArtEdu, which also includes a free preview.

Lars quilt

Lars art quilt, made with different kinds of printed fabric

No Sew Fabric Postcards

I started making fabric postcards years ago because I didn’t have the sewing chops or time to make bed-sized quilts. Postcards are my way to make very small-scale art quilts with the added wonder that they’re mail-able! Click here to see my 2012 blog post about my fabric postcards. I had been collecting vintage postcards since I was a kid, and once I began to print my own photos and designs onto fabric it was a small hop to sew them into mixed-media fiber postcard form. Here’s an example, my self-portrait photo that I printed on cotton, then adorned with a bit of gauzy fabric and stitching around the design.

Fabric Postcard

Here’s another, my photo of an egret flying with random stitching around the design lines.

Egret soaring fabric postcard

For these fabric postcards I adhere the front to thick stabilizer and then add a backing. I designed this back by scanning the back of an old postcard in my collection, cleaning it up in Photoshop Elements, and adding my name and website.

Fabric postcard back

I print this back onto fabric and then sew the front/stabilizer/back together and edge the sandwich with a satin or zigzag stitch.

These mini-quilt postcards are so much fun to make – but I recently came up with a much quicker no-sew version. I use the same design for the back, but instead of printing onto fabric I print it onto paper cardstock. The front is fabric – I print a few of my postcard-sized designs onto a sheet of pre-treated cotton, then cut each out and run through my Xyron machine to back them with permanent adhesive.

Fabric postcards

You don’t have to use a Xyron, you can use glue or double-sided tape, or spray with adhesive. Then I bond them to the cardstock backs, using a bone folder to make sure they’re well-adhered so the edges won’t come apart during their trip through the mail.

Fabric postcards

I just checked with my local post office, and they said the normal postcard rate would apply: that’s .34 for delivery in the US and $1.15 internationally. Since the postcard rate in the US applies to cards up to 6 by 4.25 inches if you want to make them larger just use the current first-class letter rate, which is now .49.

Anna's hummingbird fabric postcard

Interested in learning how to make the mini-quilt type of fabric postcards? Click here to see a free preview of my online class on CraftArtEdu, “Fabulous Fabric Postcards.”

Want to learn how to print your own fabric? Click here to find out more my ebook, Inkjet Printing on Fabric.

Continuing Adventures with Kraft Tex

Last week I showed you my first project with the new art material, natural color kraft•tex, and promised to let you know how I finished the envelope purse that I decorated with my orchid image.

I’m a bit nervous about using snaps, since even using a fancy snap-attaching gizmo I’ve had some failures. I was so happy with the piece that I didn’t want to ruin it. After realizing that if my snap-attaching went astray I could cover the flub up with a button, I got out the gizmo. Happily, it worked fine!

Kraft tex envelope purse

I’m still mulling over what kind of strap or handle to add, so stay tuned for the next step in this continuing saga. For my second kraft•tex project, I wanted to make a box. The sturdiness of kraft•tex makes it ideal box-worthy material. I used an envelope and box-making scoring board, but you can easily make this box without one. For the top and bottom of a nesting box that ends up measuring 4 x 4 x 2 inches, start with two 8-inch squares. With a ruler and a bone folder or the dull side of a butter knife, score the bottom of the box first, making four scores at 2 inches in for each side of the box. The top of the box needs to be a little looser to fit over the bottom, so subtract an eighth of an inch from each of the four scores.

I designed the box using my painterly photo of a Douglas Iris that George grew for me. To decorate the top part of the box, I sized one image at 4×4 inches, and then cropped four slices of the image for the sides at 4×2 inches. I flipped the images horizontally and printed on a sheet of Transfer Artist Paper (TAP). Here you can see the box after I transferred the TAP to the top and four sides.

Iris kraft tex box

You’ll always get a more vibrant transfer to a white substrate, and I knew that the natural color kraft•tex would darken the transfer. I included another sheet of untransferred TAP printed with the same images for you to see the difference.

To assemble your box, cut slits on all four sides (in the picture above, the slits are at one side of each of the small rectangles that form each corner, which have no image transfer). Fold the corners to the inside and adhere. I used double-sided tape, but you can use glue, paste, or your favorite adhesive. I chose to leave the bottom the beautiful natural tan color of the kraft•tex.

Iris kraft tex box

You can paint on top of TAP transfers, so I added touches of gold paint to bring out the wonderful golden yellow color at the center of the iris petals. I also streaked some paint down the sides of the image and at some corners of the box. Here’s a closeup.

Iris kraft tex box closeup

I love making boxes, and always try to make one when I find new art materials. I think kraft•tex is ideal for boxes and other structural projects where its sturdiness makes it easier to work with than paper or fabric which you’d have to stiffen or back with stabilizer.

There’s still time for you to sign up for my free demonstration of TAP, Lutradur (and a bit of kraft•tex) next Saturday March 15th at Flax Art & Design in San Francisco. I’ll have the box and envelope purse there for you to see in person! Click here to read my blog post with all of the details. 

Kraft Tex Envelope Purse

Ah, isn’t a thrill to get your hands on a new art product? Playing around to figure out its best qualities, how to use it with other products and with your images and designs … doesn’t that get your creative juices flowing?

I got a roll of natural color kraft•tex, from C&T Publishing (black and white coming soon). C&T describes kraft•tex as a “tough, touchable new paper that combines the best of leather and fabric.”  You can sew, and even wash it!

I’m a bit mail-art obsessed recently, so I decided to make a clutch purse in an envelope design. Rather than print directly onto the kraft•tex I wanted to try it with Transfer Artist Paper (TAP). Transfers usually work best on white or very light backgrounds, and I thought I’d check out how well the natural tan color of the kraft•tex would take a transfer.

I spent a blissful day last weekend photographing orchids at the Pacific Orchid Exposition, and got a striking closeup of a paphiopedelum, which I altered for a painterly effect. I thought the rich colors would blend nicely with the kraft•tex. This is the image:

Paphiopedilum orchid design

I re-sized it to fit onto the front of the purse and flipped horizontally so it would transfer with the orientation I wanted – this matters most for text, of course. To fill the rest of the sheet of TAP I designed a kaleidoscope from the original image and tiled it to transfer to the inside of the purse. This is the single tile:

Paphiopedilum orchid kaleidoscope

Next, what about the back? The four flaps of the envelope overlap, so I didn’t want to use a single image. I took a portion of the original image, resized it smaller, and tiled it onto a full sheet.

Paphiopedilum orchid sheetFinally it was time to transfer! TAP works best at the highest iron setting that the surface you’re ironing onto can withstand, so I set it on linen. Taking the front piece first, I cut out closely around the image, placed it face down onto the kraft•tex, covered it with parchment paper to protect the iron, and slowly circled around the entire piece with the iron.

Paphiopedilum envelope front

I was very happy with how it turned out, so moved on to transfer the inside piece.

Paphiopedilum envelope inside

Small details and lines in an image never show up as well in a transfer as on a direct print, but I have come to accept that as the tradeoff for the ease of using a transfer rather than treating a surface for a good direct print.

Finally, for the back, I cut pieces of the TAP sheet roughly to size and transferred them one at a time to each flap.

Paphiopedilum envelope back

Drum roll please .. here’s the front of my kraft•tex Paphiopedilum Orchid Envelope Purse!

Paphiopedilum envelope purse

And the back:

Paphiopedilum envelope back

I’m plotting what kind of closure to use. Probably something involving fabric. Stay tuned!

Oh – and I’ll be demonstrating TAP and Lutradur (and, it turns out they want me to also demo kraft•tex) on Saturday March 15th at Flax Art & Design in San Francisco. Free! Click here to read my blog post with all of the details.

Have you used a new art product lately? Please show and tell!

Transfer This! Free Workshop at Flax Art

I’m beyond excited that Flax Art & Design, the fabulous art store in San Francisco, is having me put on a free workshop demonstrating my favorite products, Transfer Artist Paper (TAP) and Lutradur!

I’ve told you about both products in many blog posts (see my list below). TAP is my go-to heat transfer paper, the best I’ve ever used. TAP allows you to easily transfer crisp, colorfast and washable images to almost any surface with your household iron. You can inkjet print, paint, stamp, or draw images onto TAP for a variety of amazing effects.

Owl wooden box

Lutradur, which I’ve also written extensively about, is a spun-bonded polyester that combines the best qualities of fabric and paper. It’s a fantastic medium for mixed media as well as for artists looking to add a new level of texture to their work.

Lutradur butterfly hanging

I’m a demonstrator and teacher for C&T Publishing,makers of TAP and Lutradur. In this free 2-hour lecture/demo at Flax, I’ll show you the entire process – from creating an image on TAP to successfully transferring it to Lutradur. I’ll bring a wide variety of samples to show you the endless potential that these two products make possible, and to spark your creativity and imagination.

Lutradur and TAP butterfly window hanging

The free workshop is March 15th, from 1 to 3 pm. Space is limited, so sign up today to reserve your spot! Call Flax Art & Design at 415.552.2355, or click here to sign up online.

Want to know more?

Check out my book: Inkjet Printing on Lutradur.

CraftArtEdu class: Inkjet Printing on Lutradur.

CraftArtEdu class about using TAP and other heat transfers onto wood.

And here’s a list of my blog posts about Lutradur and TAP:

Egret in flight lutradur art quilt

Transfer artist paper on lutradur

Photos on wooden boxes

Evolon and Transfer Artist Paper

Transfer Artist Paper on cotton

Digital collage on art board

Image Transfer to Wood

More on lutradur, Digital Ground and TAP

Wingspread Mixed-Media Art Doll

Printing with Golden’s Digital Grounds on Lutradur

Butterfly Bliss mini-art hanging

Upcycling Books into Art

How do you feel about altered book art? I know it’s controversial and discussions about the subject can become heated. I’ve been reading a lot of books about using books for art, and am interested to find that they all contain an explanation, with varying degrees of defensiveness, of the author’s philosophy.

My take is definitely colored by my nature as a lifelong book-lover. Growing up, the inevitable answer to my parents’ question, where’s Heidi? was “in her room, reading a book.” After early jobs in fast food joints, I started my “real” work-life in libraries after graduating with a degree in English Lit. My current law job involves constant reading, and now my answer to George’s question, where are you? is still pretty much the same.

So it probably makes sense that when I first found out about altered book art it made me squeamish. I understand other artists’ philosophies, but I still would not be comfortable tearing up, painting in, or cutting a book in good shape that someone else might want to read, for art or craft. My increasing interest in upcycling, defined by Wikipedia as “the process of converting waste materials or useless products into new materials or products of better quality or for better environmental value” has helped clarify my personal stance.

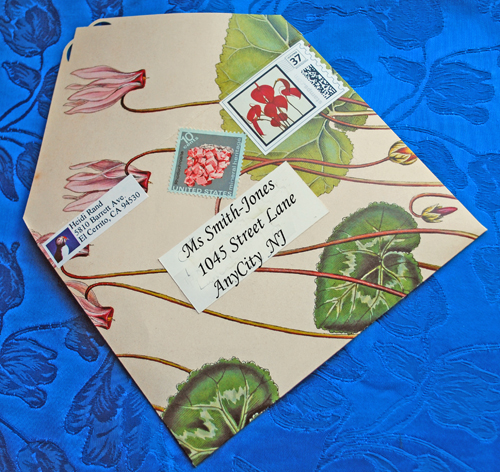
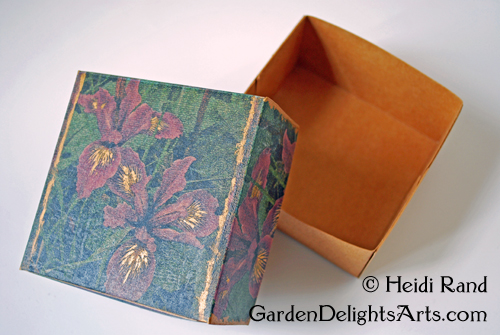
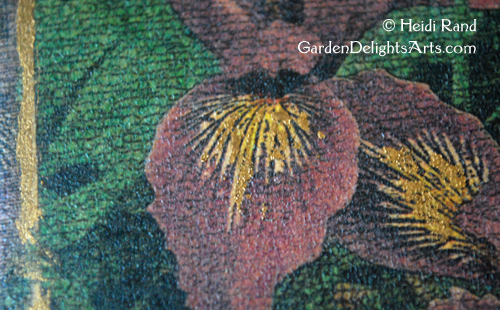
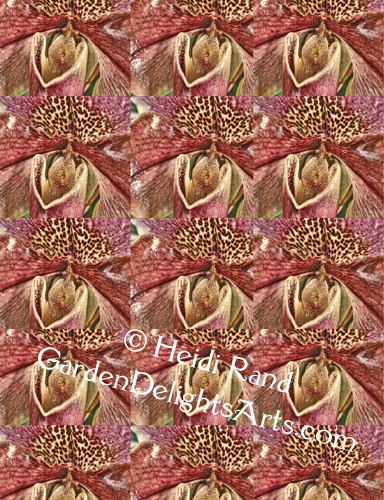
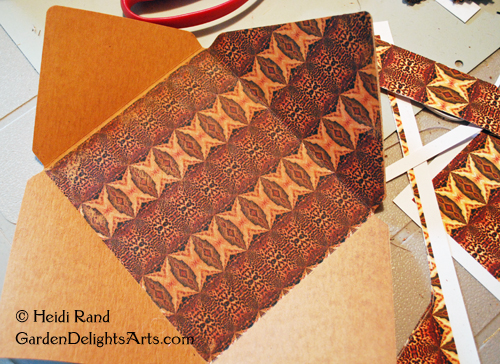
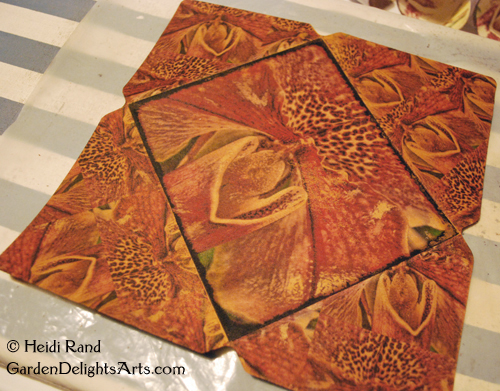
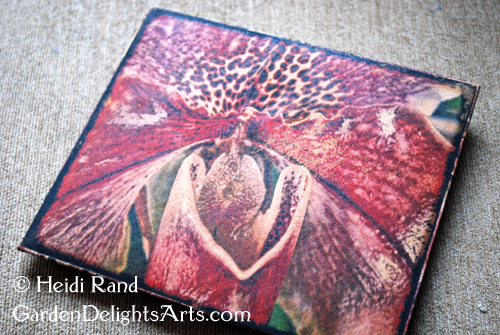
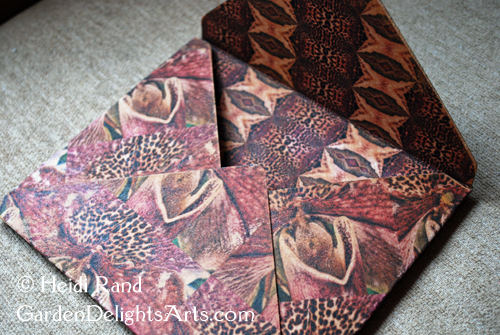
In my recent blog post “Mail Art Pen Pal” I told you about upcycled envelopes I’ve been making. Here’s one from an old calendar of botanical drawings.

Upcycled handmade envelope

Out-of-date calendar pages are ideal for upcycling into collages and other mixed-media artwork, or to use as wrapping paper. And similarly, I’ll use books that other people would not want to read – those that are headed for landfill or downcycling because they’re unreadable, ripped and torn, scribbled in, or outdated but not historically significant.

Upcycled map envelopes

I made this set of envelopes from a 1990 Thomas Bros’ book of maps, not old enough to be valuable vintage ephemera and too old to be relied upon by the few people around who don’t use Google maps or have a smartphone or GPS!

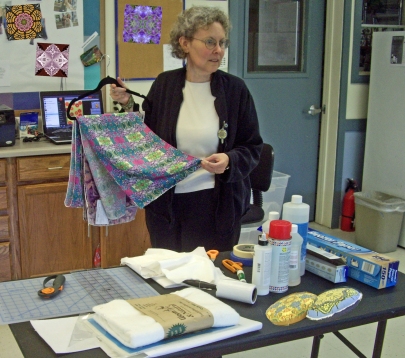
I’ve been gathering books that fit my strict criteria at the El Cerrito Recycling + Environmental Resource Center, 8501 Schmidt Lane, El Cerrito. Along with an award-winning recycling program, the Center houses an “Exchange Zone,” where people donate and take home “reusable and gently-used materials.” There’s a big dumpster filled with newly-dropped off books to scrounge through, and many are also shelved in a vague sort of order by volunteers. If I’m not sure I’ll hold it up and ask George “would anyone use this?” He has the final word.

Books

We’re also very lucky to live near another wonderful resource, the Bay Area Free Book Exchange, where you can take any book for free (up to 100 a day!) and also donate books. According to the Exchange’s website, they currently have “approximately 10,000 free books in [the] store, and have given away 406,010 books since May 2009. All books on all of the shelves are free for the taking. If you are interested in donating books, you are welcome to drop off during our business hours, Saturday & Sunday 9am-6pm.”  The Book Exchange is at 10520 San Pablo Ave., El Cerrito.

Since my artistic focus is using my photographs and the images I create from them in my artwork, I’m just very slowly starting to use books in my mixed-media pieces.

Le petit oiseau

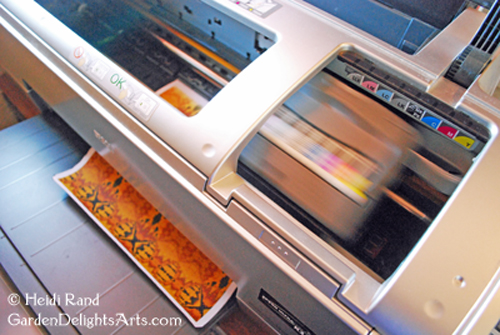
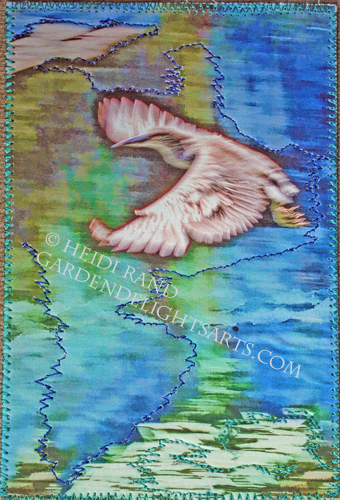
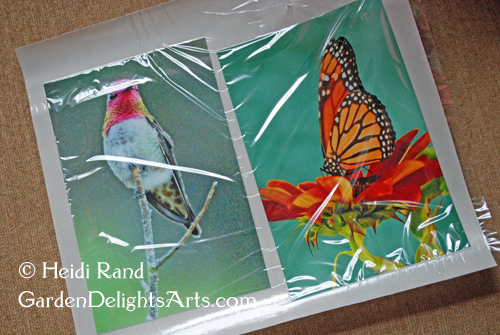
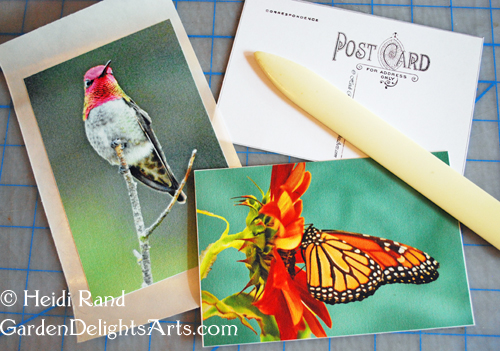
I found some pages from an old ripped-up French/English piano music book for children. Leafing through it, this page for “Le petit oiseau / The Warbler” jumped out at me. I chose several of my bird photographs and arranged them on a blank canvas in Photoshop Elements the same size as the sheet music, which I cut down slightly so it would fit in my printer. It went through with no problem. Printing on untreated paper doesn’t look the same as on paper that’s treated for inkjet inks, so the colors are a bit muted and the resolution isn’t as sharp, but I like the effect on the aged paper and with the musical notes running through the images.

I love the idea of honoring old books that were once loved but are now tattered and torn, by using them in artwork. And re-using old paper saves a sheet of the new.

Interested in finding out more? These are two of the books I found at the San Francisco Public Library: Book Art : Creative Ideas to Transform Your Books– Decorations, Stationery, Display Scenes, and More, by Clare Youngs and Playing with Books : the Art of Upcycling, Deconstructing, and Reimagining the Book, by Jason Thompson.

Inkjet Printing on Fabric Workshop

Inkjet Printing on Fabric

Workshop taught by Heidi Rand

The Village Shops, 10330 San Pablo Ave.,  El Cerrito CA

Saturday January 18, 2014 — noon to 3:00 p.m.

$40 plus supplies

Inkjet printing on fabric: One-day workshop

Welcome to the exciting world of fabric printing!  Learn to print your artwork, images and designs on fabric using your home inkjet printer. This exciting craft opens the door to endless possibilities for creating original fabric to use in quilts, art pieces, gifts, home decor, and much more.

Fabric vases

Fabric vases

I take you step-by-step through the entire process, from preparing your files to print, to choosing the right fabric and getting it ready to go through the printer, to post-printing treatment, and much more.  I will discuss the importance of knowing what kinds of inks your printer uses, and give you tips to get fabric through even the most finicky printer.

Fabric cuff bracelet

Fabric cuff bracelet

With many examples of printed fabric and fabric artwork and crafts, you’ll get new ideas about what to do with your images and designs, and the knowledge to go home and start printing your own!

If you can’t make the workshop, I also have an ebook to teach you to print on fabric.

Pre-registration is required. If you have any questions or you’re interested in registering, please email me

My other scheduled workshops:

INTRODUCTION TO SELLING YOUR ARTWORK ONLINE : February 8, 2014, Noon to 3:00 pm, $60

Overview class designed to teach you about the many different options to market and sell your artwork and/or crafts on the internet.  You will learn the pros and cons of having your own website, selling through print-on-demand websites, selling your handmade work on Etsy or similar sites, using blogs and other social marketing tools, and much more.  This information will save you much time in doing the research on your own, and save you from wasting time and money on the wrong kind of venue for your situation. Handout included.

Sell Your Artwork & Crafts Online book

EXPLORING LUTRADUR : ONE-DAY WORKSHOP : April 5, 2014, Noon to 3 p.m., $40 plus materials

Learn how to create personal art with this exciting new product that combines the best qualities of fabric and paper.  Lutradur looks, feels and folds like translucent paper and doesn’t tear or fray. It’s the perfect medium for a wide variety of mixed media art, crafting, and sewing.  Each person will complete at least one project at the workshop.  Handout included.

Inkjet Printing on Lutradur Ebook

INKJET HEAT TRANSFER TECHNIQUES : May 24, 2014, Noon to 3:00 p.m., $40 plus materials

Learn to make creative and unique artwork, crafts and gifts using heat transfers and your inkjet printer.  We will explore several products and techniques to transfer images and text to a wide variety of surfaces.  Each person will work on two transfer projects at the workshop.  Handout included.

Click here to see a list of all of my workshops.

Evolon cuff bracelet. Part 2: Printing and sewing

Last week I told you about the Evolon cuff bracelet I made using my blended digital photo collage. This was the file:

Julia butterfly cuff sheet

And this is what came out of the printer:

Cuff print

You might be shocked at the difference, but I was actually pleasantly surprised. When you print on an untreated surface, as opposed to one treated to optimize inkjet printing, you’ll see major differences – the colors aren’t as saturated, and they may even shift, and the resolution (line sharpness) isn’t as good. Think of the difference when you print a photo on untreated computer printer paper, compared to one you print on good quality photo paper.

The untreated Evolon turned out better than I expected. The colors were definitely muted, and the lines were not as sharp as the original. In contrast though, I’ve found printing on untreated Lutradur much inferior to the results I get when I treat it with Digital Ground or inkAID. On untreated Lutradur, the colors are vastly reduced in saturation and the resolution is extremely poor. I’ve also found that the ink on untreated Lutradur remains wet for quite a while, so it will smear if you need to use the print right away.

Anyway, I thought that the way the print turned out would be fine for my purposes. I cut out one of the cuffs, and as I handled it I was happy to find that the ink didn’t smear at all. I cut out two more pieces of fabric, one for the center, a stiffish beige patterned print from a home decor book that I bought at Scrap-SF (yay upcycling!), and a piece of black velvet for the back. I decided to leave all of the edges unfinished, isn’t the shabby chic look much easier, not having to bother with seam allowances and such? I did a zigzag stitch to tack the print to the beige fabric.

Evolon cuff bracelet

From my collection of buttons (mostly courtesy of my mom and estate sales), I picked a flat mother-of-pearl, and stitched thick elastic between the fabrics to attach to the button. I used two different kinds of lace around the edges, one was flat vintage lace from a garage sale, and the other some newer curly lace.

Cuff bracelet lace I stitched two different kinds of pearls and some gold-toned beads to parts of the cuff. These are small flat pearls.

Cuff bracelet pearlsAnd these are round pearls and the beads.

Cuff detail

After I finished all of the construction and adornment, I stitched the black velvet to the back, for that rich luxurious feeling only velvet has.

Evolon cuff braceletI was sad to have to send the bracelet off, and now I’m really glad I printed the second piece and I’m heading down to the studio to make another one!

Stay tuned for my further experiments with Evolon, I’m really inspired by this wonderful material.

Evolon cuff bracelet. Part 1: The design

I’ve been itching to use Evolon® since I first heard of it years ago. Unfortunately, it hasn’t been easily available in the United States. So I jumped when I had the chance to participate in a challenge to create a project with it.

First, what in the world is Evolon? The manufacturer, Freudenberg Nonwovens, describes it as “a unique microfilament fabric combining very good textile and mechanical properties. Like traditional microfiber, it is soft, drapable and light, but it is also at the same time very strong.”

It comes in two weights: Regular and Soft. For the call-out I got a 20 by 36 inch sheet of the Regular. It feels divine, with a rich, soft suede-like texture. Like Lutradur, it doesn’t tear or fray, making it much easier to use for many art and craft projects than paper or woven fabric.

I wanted to make something that took advantage of the strengths of Evolon, and I love making jewelry with unusual surfaces, so I decided to try my hand at creating an Evolon cuff bracelet. I designed the cuff by making a blended digital collage with my photograph of a Julia Butterfly and my photos of the face of an old stopwatch and a fragment of an old metal measuring device. This is the butterfly image, which will be the focal point of the design, and below it are the two other images:

Julia butterfly on zinnia

Watch and measure digital collageI started out by opening a 3 by 8 inch blank canvas on Photoshop Elements. I dragged the butterfly image onto the blank canvas and resized it to show most of the wings. I then dragged the other two photos onto the canvas and adjusted their placement and opacity. You can see the separate layers on the palette at the bottom right of this screenshot.

design with layersI erased some portions of the watch layer, including the hands, because I thought they interfered with the design. The layer now looks like this:

Screen shot stop watchHere’s the layer of the fragment of the old measuring device. It’s a very small portion of the collage, but I liked the symmetry of the numerals with the numbers on the watch.

Screen shot digital collageI’m printing a letter-sized sheet of Evolon, so I opened a new blank canvas and placed the finished collage onto it. I also duplicated and flipped the collage so I could make two cuffs, and added a smaller version at the bottom to fill the sheet.

Julia butterfly cuff sheet

In my next blog post I’ll tell you about printing, assembling, and sewing the bracelet.

Oh, okay – George thinks I shouldn’t make you wait to see the finished cuff bracelet, so here it is!

Evolon cuff bracelet

Have you ever heard of Evolon? Have you ever used it? I’d love to hear what you’re doing with it, if so. If you’re in the US, I believe the only place to buy it without paying international shipping charges is through Meinke Toy’s website. They also sell Lutradur and other wonderful fiber art supplies, and are very helpful.