New Zazzle Dazzle

I haven’t written about Zazzle in a while. I told you back in 2008 that I was an instant convert to the new print-on-demand site when I heard that I could have sneakers made from my own artwork and designs. Sadly, they stopped making sneakers, though they recently added flip-flops to the lineup. So far I’ve only designed one flip-flop (they call them sandals) out of my Peacock Feather kaleidoscope design.

Peacock kaleidoscope flip-flops

For about a year I wasn’t paying much attention to my Zazzle shop, beyond adding a few items here and there when I’d create a photo that called out to be used in a design on one of Zazzle’s products.

But I got really excited when they added clocks to the lineup! They don’t offer a template with numbers on it, so you either have to go number-less, design your own, buy a template, or find a free one to download. For George’s birthday I ordered a clock that I designed with my photo of our hen Maureen, and was really impressed with the quality. (My watermark doesn’t appear on the products.)

Hen clock

The image is sharp and bright, completely true to my photo file, and the clock itself is sturdy and well-made.

And for more Zazzle dazzle, they just started making wrist watches! One of my favorite photos of a hummingbird hovering works great on this watch, don’t you think?

Hummingbird hovering wristwatch

Some of the watch styles have numbers on the dials, but for the ones that don’t, I discovered that my clock template works for the watches as well, which makes it more worthwhile to invest in buying a good template from an expert if you’ll be designing clocks and watches.

You know me, I’m incredibly happy when I can use my artwork to adorn useful things, so I’ve been going crazy designing watches. Here’s one of my favorite new photos, a monarch butterfly on a zinnia flower, on a wristwatch.

Monarch butterfly on flower on Zazzle

Click here to go to my Zazzle shop to see all of the products I’ve adorned with my artwork. Do you have a Zazzle shop? I’d love to check it out, please leave a link in the comments. And if you’re an artist and haven’t tried designing on Zazzle, it’s really fun (but addictive! )

Beyond paper : inkjet printing on alternative surfaces

In this one-day workshop, you’ll learn to make creative and unique artwork by printing on surfaces other than paper.  I’ll introduce you to several different products and techniques to print directly on fabric, vellum, transparency film, and more.
Butterfly altar

Butterfly altar

You will learn how to coat surfaces for inkjet printing with Golden Paint’s Digital Grounds and inkAID.
Golden's digital grounds

Golden's digital grounds

We’ll also print directly on metal and wood veneer — since a printer with a straight path is required for these surfaces you may not be able to do this with your current home printer).
We will complete at least one printing project per person at the workshop.
The workshop will be held on Sunday September 19, 2010 from noon to 4:00 p.m. at the Canyon Trail Park Art Center in El Cerrito, and the cost is $60 plus materials. Class size is limited and pre-registration is required, if you’re interested, please email me at heidirand@gmail.com

CraftEdu goes live!

Finally – after months of working on classes, taking photographs, writing scripts, narrating, annotating, editing, polishing …  CraftEdu goes live in beta today! I’m so honored to be part of this wonderful group of talented teachers, artists and crafters.  We’re a diverse group, with something for everyone: lots of jewelry artists of all stripes (Donna Kato, the polymer queen, is our fearless leader), but you can also find classes on digital art, fiber and textiles, encaustic, rubber stamping, mixed media, and much more!   Click here to visit CraftEdu.

I have two free classes up: Inkjet Inks, What You Need to Know for Your Arts & Crafts; and Introduction to Lutradur.   I also have two on demand classes up so far: Inkjet Printing on Fabric and Inkjet Printing on Lutradur. I’m busy working on more.  Join my group to ask questions, share ideas, or get information!

CraftEdu

Inkjet Printing on Fabric Workshop

Inkjet Printing on Fabric

Workshop taught by Heidi Rand

Canyon Trail Art Center, El Cerrito California

Saturday May 22, 2010 – noon to 3:30 p.m.
$35 + materials

Lavender rust quilt

Lavender rust quilt

Welcome to the exciting world of fabric printing!  Learn to print your artwork, images and designs on fabric using your home inkjet printer.  This exciting technique opens the door to endless possibilities for creating original fabric to use in quilts, art pieces, gifts, home decor, and much more.

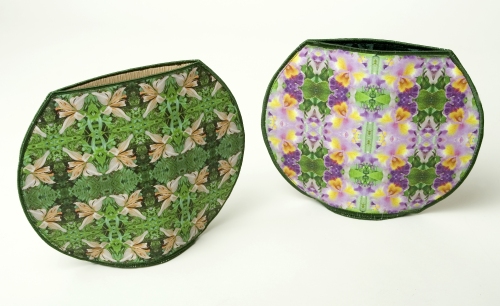
Fabric vases

Fabric vases

I take you step-by-step through the entire process, from preparing your files to print, to choosing the right fabric and getting it ready to go through the printer, to post-printing treatment, and much more.  I will discuss the importance of knowing what kinds of inks your printer uses, and give you tips to get fabric through even the most finicky printer.

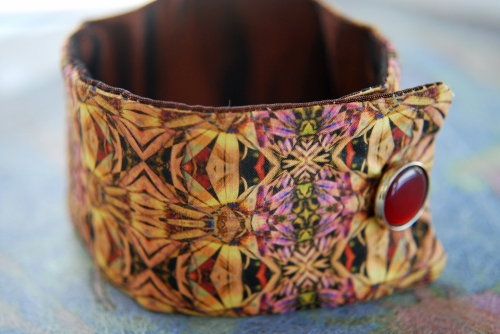
Fabric cuff bracelet

Fabric cuff bracelet

With many examples of printed fabric and fabric artwork and crafts, you’ll get new ideas about what to do with your images and designs, and the knowledge to go home and start printing your own!

Pre-registration required.  Please email me at HeidiRand@gmail.com

Upcoming workshops:

Saturday June 19, 2010, noon to 4. Art quilts and fabric hangings. El Cerrito Canyon Trail Art Center

Saturday July 17, 2010 noon to 4:00 p.m.  Inkjet transfer techniques. El Cerrito Canyon Trail Art Center

Sunday August 29, 2010, noon to 3:30 p.m. Photo Art : Altered Imagery. El Cerrito Canyon Trail Art Center

Sunday September 19, 2010, noon to 4 p.m. Beyond paper : inkjet printing on alternative surfaces.  El Cerrito Canyon Trail Art Center

Sunday October 24, 2010, noon to 3:30 p.m.  Exploring lutradur.  El Cerrito Canyon Trail Art Center

Sunday November 21, 2010, noon – 3:30 p.m.  Handmade gifts with your inkjet printer. El Cerrito Canyon Trail Art Center

Have questions? Interested in registering?  Please email me

If you can’t make the workshop, I also have an ebook to teach you to print on fabric and online classes at CraftEdu

Inkjet Heat Transfer Techniques : One-day workshop

Learn to make creative and unique artwork, crafts and gifts using heat transfers and your inkjet printer. We will explore several products and techniques to transfer images and text to a wide variety of surfaces. You will complete at least two transfers at the workshop.

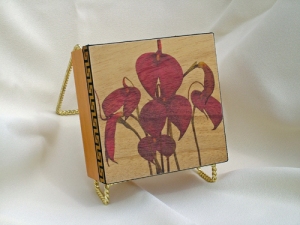
Masdevalia orchid box

Masdevallia orchid box

Sunday February 21, 2010, noon to 4.  Canyon Trail Park & Art Center, 6757 Gatto Ave., El Cerrito. $40 plus materials

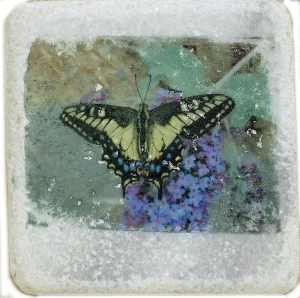
Swallowtail butterfly tile

Swallowtail butterfly tile

You can use heat transfers on fabric, wood, tile, metal, and many other surfaces.  It’s a versatile way to place your photographs and images onto things that you can’t fit through your printer!  For best results, I usually recommend using the  iron-on transfers that your printer manufacturer offers.  There is an exciting new product though, Transfer Artist Paper (TAP), that works very well for transfers.  You’ll have a chance to try TAP at the workshop. I made the frame for this lutradur piece with TAP transferred onto a canvas board.

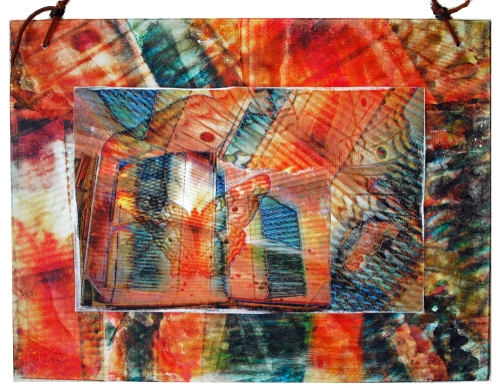
Butterfly window collage lutradur and TAP

Butterfly window collage lutradur and TAP

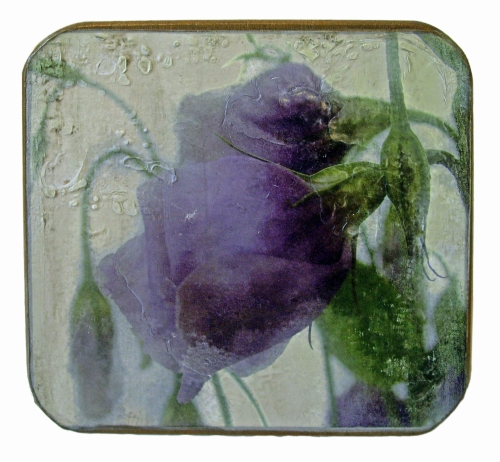
Another heat transfer product I like is by Lazertran, the company that makes the waterslide decals that I use in many of my art pieces.  The top of this box is a lazertran heat transfer.

Lisianthus box heat transfer

Lisianthus box heat transfer

Here are some of my blog posts about using heat transfers:

Photos on wooden boxes, part 1

Photos on metal, part 1

Photos on tiles, part 1

For more information, or to pre-register, email me at heidirand@gmail.com.   For the complete list of my workshops and other events, go to the Calendar on my website.


Handmade gifts with your inkjet printer : one-day workshop November 15th

This is going to be a really fun workshop.  I’ll show you how to make personalized gifts (for friends and family or for yourself!) using your own photographs, designs, or other material and your home printer.
Fabric on tote bag

Fabric on tote bag

 We’ll explore a  variety of different techniques to create unique gifts, like printing on fabric and other special surfaces ideal for making presents.  Each person will complete at least one project at the workshop, and you’ll go home with many ideas and new things to try on your own printer.  There’s plenty of time before the holidays to create gifts for everyone on your list!

Lavender sachet

Lavender sachet

When you make a personalized gift you can save money and show that you care to take the time to create something special for your loved ones.

Fabric covered light switch plate

Fabric covered light switch plate

You can use photographs and the originals or scanned memorabilia of things in your lives together for gifts that people will treasure and keep. 

Treasure bags with fabric iron-ons

Treasure bags with fabric iron-ons

The workshop will be Sunday November 15, 2009, noon to 3:30.  Cost is $35 plus materials. It will be held at the Canyon Trail Art Center in El Cerrito California.  Please pre-register by emailing me at heidirand@gmail.com, or you can pre-register at the El Cerrito Recreation Department, 7007 Moeser Lane El Cerrito, (510) 559-7000.

If you want to see the gifts that I make from my photographs and designs, please visit my ETSY shop.

Inkjet Fabric Printing – step by step instructional ebook

I just finished my very first ebook, on my most favorite subject: inkjet printing on fabric.  After writing an extensive booklet for the workshops I’ve been teaching, I decided to put it into ebook form so people who can’t come to my workshops could get the same information.

Inkjet fabric printing ebook

I take you through the entire process to quickly and successfully begin printing fabric on your inkjet printer. You will learn about types of inks, differences between treating fabric yourself or printing on pre-treated fabric, how to prepare fabric for printing, printing the fabric, post-printing treatments, and more.

The information and tips I’ve learned over years of printing on fabric will save you hours of time and much wasted ink and fabric. I have included many illustrations, questions and answers, and trouble-shooting tips.

Illustration: peeling off backing

Illustration: peeling off backing

There’s even a gallery of my original fabric creations to spark your imagination and creativity.

Gallery: butterfly art hanging

Gallery: butterfly art hanging

There are many books on the market about printing on fabric, but because the technology is moving so quickly, a lot of them are outdated. My guide is up to date, and I will revise it as often as needed to reflect changes in the field of inkjet fabric printing. Also, most of the books give general information that might not apply to your personal printer/ink setup. I tell you how to figure out what kind of inks your printer uses, and I can also answer by email personalized questions about your setup, or other problems you run in to when you print fabric. I also discuss the pretreated fabrics that are available commercially, and share the results of my extensive experimentation with printing using the different inks.  In the second edition of the ebook, now available, I added information about using two great products with fabric, inkAID and Golden Paints Digital Grounds (both coatings that make any surface inkjet printable.)  I’ve written a lot in this blog about Digital Grounds, and I wanted to expand the book to include these coatings – most appropriate for art fabric uses.  I also deemphasized the use of Bubble Jet Set 2000, a liquid solution that is the most common product used by people who want to treat fabric themselves for inkjet printing.  BJS contains formaldehyde, and I know a lot of people are concerned about any potential danger.  If you’re interested in the subject, the manufacturer addresses the issue in an article (read it by clicking here).

My ebook is in the format of a PDF file, which you can open and print using Adobe Reader.  I’m offering it through my etsy shop or lulu.com for $10.  Click here for the link to my ebooks section on etsy. If they are sold out and you would like one, please let me know and I will post more copies.  Or click here to see a preview and get it through my lulu shop.

More fabric printed by spoonflower

For my second order from spoonflower.com I decided to have them print a few large images on a yard rather than a tiled, repeating pattern.  My cousin had ordered a pillow from me months ago, and I was dragging my heels on it because I couldn’t  print it myself as large as she wanted.  This is the image she wanted:

Photograph of an angel's trumpet flower

Photograph of an angel's trumpet flower

I took this photograph of an angel’s trumpet (brugmansia) flower in our back garden.  I amped up the colors a bit and took out some detail, then smudged the lines to give the image a dreamy effect.  I used it for the front of one of my Open Studio postcards, and my cousin loved it.

I resized the image to 12 by 16 inches and had a friend convert it into LAB space for me, because I didn’t have Photoshop at the time.  As I mentioned previously, my cherished Photoshop Elements doesn’t have the capability of converting to LAB space.  It turns out that of course I couldn’t do anything with the converted file other than send it as is to spoonflower, because Elements wouldn’t open the file in LAB.  So my plan to address the colors that were out of gamut in LAB space didn’t work out.  As you can see from the picture above, the colors are quite vivid, and a lot of them were out of gamut.  I  decided to send the file as it was to spoonflower, to see what happened.   To fill out the entire yard I included some other designs that I planned to make into pillows or sachets.

This is how the fabric with the angel’s trumpet image on it turned out:

Angel's trumpet flower fabric

Angel's trumpet flower fabric

I’m satisfied with it, especially for the price.  The colors aren’t quite as they are in the file, but they are nicely saturated, which was the effect I wanted for the pillow.

This is how the pillow turned out.  The second pillow is also for my cousin, it’s my ‘Iris & Bromelia’ mandala design.

Pillows from spoonflower fabric

Pillows from spoonflower fabric

I know I keep mentioning the price in relation to spoonflower. If I wanted fabric printed that looked as good as it can on high quality inkjet paper, I would have to pay far more to do it myself with some of the very high quality treated fabrics, like EQ Printables or Colortextiles.  But then this pillow would end up costing far more than I want to charge.  As it is, I don’t sell many of the smaller pillows I make from pretreated 8.5 by 11 inch fabric, I suspect partly because of the price I set for them ($30).

I made another pillow from one of the other images that I included on this same yard order.  Here’s the image:

Butterscotch rose kaleidoscope

Butterscotch rose kaleidoscope

This is one of my favorite kaleidoscope designs, which to me evokes the Arts and Crafts style.  I started with my photo of a butterscotch rose in our garden and cropped it so that kaleidoscoping it put the edges of the rose together, and created a simple geometric design from the foliage and stem. The color of the rose is true – the rose is a rich, saturated caramel color that gets a tinge of blush as it ages.

I had spoonflower print it to about 8 by 14 inches.  Here’s the pillow I made from the fabric:

Butterscotch rose kaleidoscope pillow

Butterscotch rose kaleidoscope pillow

Again, I’m satisfied with the fabric.  The colors are a little bit out of gamut, which is my fault because I didn’t address that before I sent the file to spoonflower.  The resolution isn’t as sharp as the fabric I print myself, which matters more to me than the colors.

I haven’t spoken to the hand of the spoonflower fabric.  At this time, spoonflower only offers printing on Moda cotton.  Their blog states that they’re going to be adding more fabrics,  but that hasn’t happened yet.  I like the fabric for pillows.  It’s a nice tight weave, which is very good for detail.  It’s soft but has substance.  And it was a dream to sew.  I have found that some of the pretreated fabrics I use are hard on my sewing machine needles.  When I need to sew several layers, or have used stabilizer or timtex for a fabric vase, I can have trouble getting the needle through.  I have even broken some needles when sewing purses.  None of those problems with the spoonflower fabric.

I had some more images on that yard, stay tuned….!

Printing fabric through Spoonflower – Part 1

I love to print fabric from my designs myself, but am constrained by the size of my R2400 printer, which can only print 13 inches wide.  I could theoretically print as long as I like with this printer, but unless I do a work-around that I haven’t had the energy to set up, I can only print to 44 inches long.  So to make larger scarves, I had http://pixeladies.com print several of my designs to 12 by 60 inch charmeuse and habotai silk scarves.  They are so beautiful – especially the charmeuse, which feels indescribably luxurious.  I highly recommend pixeladies, they’re very helpful and friendly.  Their prices aren’t low, but are fair for the quality of the product.

Another fabric printing service recently opened for business.  Spoonflower.com was in beta for awhile but has now begun taking orders to print your self-designed fabric in various sizes.  At this point they’re only printing on Moda cotton.  You can order a swatch (8×8 inches), a fat quarter, or a yard.  Shipping on my order was really reasonable, although through a quirk in their shopping cart, if I had ordered the two separate yards together in one order the shipping would have been $7.  When I ordered them separately I was only charged $3 for each.  Silly to care about a dollar, but there you go.  The prices for their fabric are very reasonable.  They charge $18 for a yard.

The instructions for preparing your file to order fabric are contained in their blog, here: http://blog.spoonflower.com/2008/05/how-do-i-prepar.html

Frankly, I first thought of ordering fabric months ago but was a little put off by the instructions, which aren’t very comprehensive.  But I had an order to make a pillow that was larger than I could print, and I was determined to try spoonflower.  So this time I knuckled down and looked carefully at the directions.  Now, I have used Photoshop Elements and other similar programs for years, and have a good familiarity with them.  But for some reason I was befuddled by spoonflower’s requirements.  I think this is partly my fault, and partly the fact that the instructions are a bit too general, and definitely not broken down enough for someone who isn’t familiar with the vagaries of image resizing, dpi, etc.

Since I almost always print my own images, I never really needed to know how to find out what the size of my images is (not the size of the print, as in height and width, but the size in MBs).  Therefore, when I saw that my file could not be larger than 25 MB, I was befuddled.  After not getting enough help from spoonflower itself, it took several panicked emails to a photoshop expert friend, a post to the very helpful folks on the Photoshop Elements yahoo group and some plaintive queries to my friends on facebook, before I learned how to resize and check the size (in MBs) of my image on Elements.  Phew!

The other somewhat complicated part was that spoonflower recommends putting your files into LAB color space.  They have a good explanation of that on their blog, so I’m not going to repeat it here.  However, Photoshop Elements does not provide for conversion to LAB color space.  Spoonflower explains that you can provide images in other color spaces, but that there might be more of a color shift if you’re not using LAB.  I decided to take my chances, and sent a file in RGB color space.  I think the colors turned out fine in my finished product, but I’m not a color perfectionist like some of my friends, so you’ll really need to decide that aspect for yourself.

I ended up loading an old version of full Photoshop onto my computer today and sent another order in.  I included the same image on the order, one in LAB and one in RGB.  I’ll let you know what happens!

So when you make your order, you can have them tile your basic image in several different ways (or not at all, if you have just a single image or if you have your own method for a repeating pattern).  When you click the different choices, you can see how the fabric would ultimately look, which is really useful.

These are the two images I ordered printed: http://tinyurl.com/3rz8sb

I finally got a chance to photograph the fabric!  Here are pictures of the 2 yards they printed for me.

my Blue girl rose and bouquet collage design

Spoonflower fabric: my Blue girl rose and bouquet collage design

my Blue girl rose and bouquet collage design

Spoonflower fabric: my Blue girl rose and bouquet collage design

Oh, I should describe the design of the fabric I guess.  I took my photographs of a blue girl rose in our garden (my favorite rose, it has an exquisite, unusual blue/lavender color and a strong powdery scent) and a bouquet of flowers that I gave to my mother.  I blended the photographs and adjusted the colors.   I kaleidoscoped portions of the design and that produced the end-design that I used for this fabric.

This is the second yard of fabric.

Spoonflower fabric from my White daisies collage design

Spoonflower fabric from my White daisies collage design

Spoonflower fabric from my White daisies collage design

Spoonflower fabric from my White daisies collage design

This design originated with a photograph I took of a daisy with long white petals.  I duplicated the photograph, blended the layers and played some with the colors.  I kaleidoscoped the design and ended up with this end-design, which Spoonflower tiled to produce the yard of fabric.

Hopefully you can tell from the photographs that the fabric is very true to the original images that I uploaded.  The colors are extremely saturated and the resolution is great.  Next time: waiting for my second Spoonflower order!

Zazzle

Recently I started a gallery on zazzle.com.  I have been trying to add a small panel to this blog showing some of the products, but haven’t been able to do that yet.  I think my web genius friend, Nadine, is going to solve this problem for me.  I know just enough about websites to know that there’s tons I don’t know.  Anyway, zazzle.com is a print on demand company that lets you put your own images and designs onto the products that they then print and ship.  I was won over to zazzle by the fact that you can make your own SNEAKERS!  In fact, I won a “Today’s Best Award” at zazzle for one of my sneaker designs that I made from a photograph of a zebra I took at the Oakland Zoo.

The other unique product you can make at zazzle is a tie.  I ordered one for George, and wasn’t ecstatic about the quality.  They’re polyester, and I’m used to my own perfect prints on silk or soft cotton, and I wasn’t impressed about the slight lack of sharpness they achieved with the polyester.  But I’ll probably order another to make sure.

Otherwise, you can get the normal products that other print on demand services offer, including custom postage, cards and prints, mugs, t-shirts, buttons, magnets, etc.  I’ve been very impressed with the quality of everything I’ve ordered other than the tie.  I have gotten several t-shirts, mugs and postcards.

For me, the strength of the zazzle website is in instantly seeing how my designs look on different products.  It’s incredible that you can just click the template for a product, upload your design, and see how it would work as a sneaker!  Getting a gallery is free, and you choose the amount of the royalty you want to get from anything that sells.   If you have a gallery and you order your own products you pay a basic rate.  They have a somewhat complicated discount program that I’m not even going to try to explain.

Their customer service is incredibly good.  I have called and emailed questions and get responses very quickly.  I bought some of my own things to sell and wanted to use my tax exempt status, since they’re in California.  They responded almost instantly with a clear and easy explanation of how I could do that.  I remember trying to use my tax exempt certificate with smugmug about a year ago and being told they weren’t set up to handle it.