Transfer This! Free Workshop at Flax Art

I’m beyond excited that Flax Art & Design, the fabulous art store in San Francisco, is having me put on a free workshop demonstrating my favorite products, Transfer Artist Paper (TAP) and Lutradur!

I’ve told you about both products in many blog posts (see my list below). TAP is my go-to heat transfer paper, the best I’ve ever used. TAP allows you to easily transfer crisp, colorfast and washable images to almost any surface with your household iron. You can inkjet print, paint, stamp, or draw images onto TAP for a variety of amazing effects.

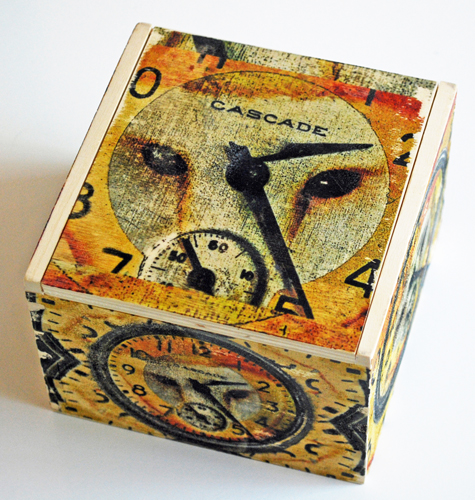
Owl wooden box

Lutradur, which I’ve also written extensively about, is a spun-bonded polyester that combines the best qualities of fabric and paper. It’s a fantastic medium for mixed media as well as for artists looking to add a new level of texture to their work.

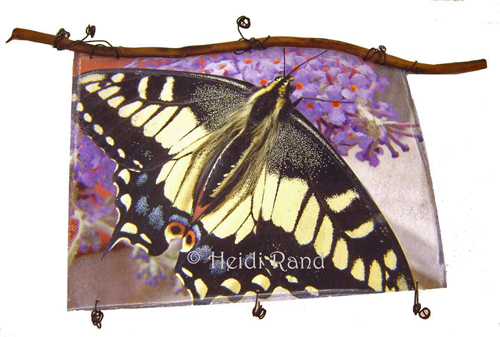
Lutradur butterfly hanging

I’m a demonstrator and teacher for C&T Publishing,makers of TAP and Lutradur. In this free 2-hour lecture/demo at Flax, I’ll show you the entire process – from creating an image on TAP to successfully transferring it to Lutradur. I’ll bring a wide variety of samples to show you the endless potential that these two products make possible, and to spark your creativity and imagination.

Lutradur and TAP butterfly window hanging

The free workshop is March 15th, from 1 to 3 pm. Space is limited, so sign up today to reserve your spot! Call Flax Art & Design at 415.552.2355, or click here to sign up online.

Want to know more?

Check out my book: Inkjet Printing on Lutradur.

CraftArtEdu class: Inkjet Printing on Lutradur.

CraftArtEdu class about using TAP and other heat transfers onto wood.

And here’s a list of my blog posts about Lutradur and TAP:

Egret in flight lutradur art quilt

Transfer artist paper on lutradur

Photos on wooden boxes

Evolon and Transfer Artist Paper

Transfer Artist Paper on cotton

Digital collage on art board

Image Transfer to Wood

More on lutradur, Digital Ground and TAP

Wingspread Mixed-Media Art Doll

Printing with Golden’s Digital Grounds on Lutradur

Butterfly Bliss mini-art hanging

Handmade Jewelry With Your Inkjet Printer : Workshop

Learn to make personalized jewelry using your own images, designs, and artwork.

Swallowtail butterfly lutradur earrings

Swallowtail butterfly lutradur earrings

We’ll explore several techniques to create unique earrings, necklaces, bracelets and pins from paper, fabric and lutradur that you print on your inkjet printer. Each person will work on at least one project at the workshop, and you will go home with many ideas and new things to try on your own printer.

Fabric cuff bracelet

Fabric cuff bracelet

Making a personalized gift saves money and shows that you care to take the time to create something special for friends and loved ones, as well as for yourself! Using your photos and scanned memorabilia of your own life ensures that your gifts will be treasured and kept forever.

Photo charm necklace

Photo charm necklace

The workshop will be held Saturday June 8, 2013, noon to 3:30 p.m. at The Village Shops and Galleries in El Cerrito (between Eureka and Stockton Ave.)  Cost is $40 plus materials.  For more information or to pre-register, please email me at heidirand@gmail.com.

Butterfly Bliss mini-art hanging

These days my creativity is best sparked by challenges organized by groups I’m in. I haven’t made an art hanging in a while, so when the call-out came to make a piece using some art material (I’ll let you know which when the challenge is over), I decided to use it in a mini-art quilt. As it’s prime butterfly season, incorporating my favorite flying beauties into the piece was a gimme.

Butterfly Bliss

I had the butterflies in my stash. They were photographs I took of an anise swallowtail and a monarch butterfly that we raised and released. I printed the photos onto lutradur that I treated with Golden Paint Digital Grounds. When I need to print something onto lutradur, I fill the entire sheet with images so as not to waste any of the treated material.

Closeup anise swallowtail butterfly on lutradur

To set off the butterflies, I sewed them to some gauzy fabric bits that came in a flea-market home decor fabric sample book. For the background, I chose another larger piece from the sample book.

Closeup monarch butterfly on lutradur

I chose another piece from the sample book as a backing for a finished look, and slid a piece of firm stabilizer in between so it will hang without folding. I folded the top over and strung a leather cord through before I sewed it closed, for an easy hanger.

I love art quilts because they can be as simple or as complicated as you wish. If you don’t like to sew you can even just use double sided tape to add elements and make the seams. They’re a great use to upcycle discarded clothing or other fabrics. Have you made an art quilt? Post links here to any of yours that you’d like to show!

Kindle-Garden Delights part 2

When last we met I promised to let you know about my adventures in making my ebook into kindle-ready form. To cut to the end of the story … here it is!

If you’re thinking of kindling yourself (no, that’s not a dirty suggestion), rather than paying someone to do it for you, the best place to start is Amazon’s own help pages.  When you run into problems, you can also check with the related Community forum – lots of questions and answers, and you can post your own queries.

My first obstacle – I don’t have Microsoft Word on my computer. My husband has it on his, but I have WordPerfect instead. One of the critical steps in kindle-izing a book requires saving the file as filtered html, which you can’t do in WordPerfect.  Now, it’s not just that I’m lazy and didn’t want to walk upstairs to his computer. Switching to the other computer meant that I’d have to load some new programs onto his computer (and that makes him cranky), and that I’d have to transport my document and image files (not a big deal, but l was so exasperated that even that small task made me cranky).

Anyway, I stubbornly decided to try the process without using Word.  This decision at least led me to a great resource —  Judith Tramayne’s videos and materials to help authors self publish books on the kindle and other ereaders.

Judith has a series of comprehensive videos that seem very reasonably priced to me, and she offers a lot of her content free – including a series of macros that make it much easier to correctly format the html document that is the best way to get an ebook kindle-ready.  I watched her free videos and downloaded the macros, and took her advice to install Crimsoneditor, a free source code editor.  From the quality of her free videos, I think that paying for the series would be well worth it.  I decided not to because I was so far along in the process that I only needed a bit of trouble-shooting to finish.  But if you’re at the early end of the learning curve, it looks like a good option.

Since my ebook was written in WordPerfect, I had to copy and paste it, paragraph by paragraph, into Crimsoneditor.  Using Judith’s macros to add the correct html coding made the process much easier.

Images are another thing – the kindle is really designed for books without a lot of images. The basic kindle is only black and white, and you can’t really do much fancy with images.

I found the html code to include images, and quickly resized all of my photos for the book in Photoshop Elements.  Unfortunately, the images turned out to be my first big challenge.  I took my nice neat html document made in Crimsoneditor and ran it through MobiPocket Creator to build the book.

For a moment I thought all was well – I scrolled through the ebook in the kindle previewer that I had downloaded from Amazon. Chapter headings … check; text … check;  and the images were all there!! Yes!! But then I got to the last page and found, to my dismay, that all 60 images in the book were also duplicated in a long long row at the end of the book. Yikes.

I looked for some answers on the community forum but never found any satisfactory explanation, and certainly no cure.  The duplicate images weren’t included in the html coding.  Instead of spending a lot of time trying to figure out a fix, I decided to do what I should have done in the first place.  I put the html document and image files onto a flash drive, trudged upstairs to my husband’s computer, and fired up Word. I saved the html document in Word as filtered HTML and ran it through MobiPocket.  It worked! No trailing images. Now one thing that is puzzling — still more comfortable on my computer, I took the filtered HTML file to my computer and ran it through MobiPocket there – alas, I had the same duplicate images problem.  (Insert sad face here)…  So it actually could be that the problem was not caused by not using Word, but due to the fact that I’m saddled with Vista 64-bit on my computer (I know, I can’t stand it either). I read somewhere during my desperate search for help that Vista may cause problems with parts of the kindle-izing process.

To wrap up this saga, there was some more wrestling with the Table of Contents, but suffice it to say that I finally followed the directions carefully and after pulling out some more hair I managed to generate a clickable TOC! It’s not pretty but I’m damned proud of it, so here it is ..

Anyway, the bottom line – if you have Word, some familiarity with html coding, and a lot of patience and time, go for it and try to do it yourself. It’s very rewarding when it finally all comes together.
Exploring lutradur : one-day workshop

Workshop taught by Heidi Rand

Sunday October 24, 2010, noon to 3:30 p.m.

$40 + materials

Butterfly window collage on lutradur

Learn to create art quilts and other arts & crafts with this exciting new product that combines the best qualities of fabric and paper.  Lutradur looks, feels and folds like translucent paper and doesn’t tear or fray. It’s the perfect medium for a wide variety of sewing, mixed media art and crafting.

Egret in flight lutradur hanging

I will give an overview and demonstrate many ways to use lutradur: sewing, inkjet prints, transfers, heat gun, soldering iron, stamps, and more… You will have time to explore a variety of effects to create a mixed media art project.

Lutradur iris purse

Bring your favorite art materials to try on lutradur, as well as any photos, beads, etc. for your personal project.  Bring your sewing machine if you want to use it to sew your project.

The workshop will be held at the Canyon Trail Park Art Center in El Cerrito. Class size is limited and pre-registration is required, so if you’re interested, please email me at heidirand@gmail.com

Upcoming workshops:

November 21, 2010, noon to 3:30 p.m., Handmade Gifts With Your Inkjet Printer

February 20, 2011, noon to 3:30 p.m., Inkjet Printing on Fabric

Interested? Please email me

Exploring Lutradur : one-day workshop

Workshop taught by Heidi Rand

New Pieces Quilt Store & Gallery, Berkeley California

Saturday January 23rd – noon to 3:30 p.m.
$34 + materials

Butterfly window collage on lutradur

Butterfly window collage on lutradur

Learn to create art quilts and other arts & crafts with this exciting new product that combines the best qualities of fabric and paper.  Lutradur looks, feels and folds like translucent paper and doesn’t tear or fray. It’s the perfect medium for a wide variety of sewing, mixed media art and crafting.

Egret in flight lutradur hanging

Egret in flight lutradur hanging

I will give an overview and demonstrate many ways to use lutradur: sewing, inkjet prints, transfers, heat gun, soldering iron, stamps, and more… You will have time to explore a variety of effects to create a mixed media art project.

Lutradur iris purse

Lutradur iris purse

Bring your favorite art materials to try on lutradur, as well as any photos, beads, etc. for your personal project.  Bring your sewing machine if you want to use it to sew your project.

Pre-registration required.  Please call New Pieces at (510) 527-6779 to pre-register, or if you have questions, please email me at HeidiRand@gmail.com or call 510.919-4652.

The next few months’ upcoming workshops:

Sunday February 21, 2010, noon to 4. Inkjet heat transfer techniques. El Cerrito Canyon Trail Art Center.

Saturday, March 6, 2010, noon to 4. Inkjet printing on fabric. New Pieces Quilt Store, Berkeley.

Saturday May 22, 2010, noon to 3:30. Inkjet printing on fabric. El Cerrito Canyon Trail Art Center

Saturday June 19, 2010, noon to 4. Art quilts and fabric hangings. El Cerrito Canyon Trail Art Center

Interested? Please email me

Exploring Lutradur : One-day Workshop

Workshop taught by Heidi Rand

Canyon Trail Park & Art Center, El Cerrito
Sunday September 13th – noon to 3:30 p.m.
$35 + materials

Butterfly window collage on lutradur

Butterfly window collage on lutradur

Learn ways to create personal art with this exciting new product that combines the best qualities of fabric and paper.  Lutradur looks, feels and folds like translucent paper and doesn’t tear or fray. It’s the perfect medium for a wide variety of mixed media art, crafting, and sewing.

I will give an overview and demonstrate many ways to use lutradur: sewing, inkjet prints, transfers, heat gun, soldering iron, stamps, and more…
You will have time to explore a variety of effects to create a mixed media art project.

I will provide paints and other basic supplies.  Bring your favorite art materials to try on lutradur, as well as any photos, beads, etc. for your personal project.

Email me at HeidiRand@gmail.com or call 510.919-4652

The schedule of my upcoming workshops, all in Canyon Trail Art Center, El Cerrito CA

Sunday September 13, 2009, noon to 3:30. Exploring Lutradur

Sunday October 25, 2009, noon to 4. Inkjet transfer techniques

Sunday November 15, 2009, noon to 3:30. Handmade gifts with your inkjet printer

Saturday January 16, 2010, noon to 3:30. Handmade jewelry with your inkjet printer

Sunday February 21, 2010, noon to 4. Inkjet heat transfer techniques

Interested in any? Please email me

More on lutradur, Digital Ground and TAP

I have so many ideas about how to use my images and designs on lutradur, and I wanted to get more clarity on the difference between printing on it with Digital Ground and transferring onto it with TAP (Transfer Artist Paper).  Building on my earlier attempts with these two products, I decided to print the same images on them and see what happened.

Since it’s springtime I’m surrounded by butterflies in our garden and our house — we’re raising some monarch butterflies from eggs that were laid on the milkweed in our garden.  I’m going to put up a blog post about that, but if you want to see my closeup photographs now, visit the Monarch Butterflies gallery on my smugmug site.

It seemed natural, then, to do the experiment with some butterfly images.  I took my photographs  of a swallowtail butterfly and a monarch butterfly, and fashioned designs from one wing of each.  First I printed the wings on lutradur that I had coated with white matte Digital Ground (see my prior posts for detailed instructions).  I printed on the enhanced matte media and highest quality settings.  Next I printed the same files onto  TAP, using the settings that Lesley Riley recommends: plain paper and fine quality, and ironed the TAP onto the same weight lutradur.

The results are quite different. The monarch butterfly wing image on the right is the one I printed with the Digital Ground-coated lutradur, and the one on the left is the TAP transfer.

Lutradur printed with Digital Ground and TAP

Lutradur printed with Digital Ground and TAP

The DG print is much sharper, you can see more detail, whereas the resolution of the TAP wing is blurrier.  The colors on the TAP transfer are more saturated than the DG print.  I had the same results with the swallowtail design. You can see more vividly the difference in the color saturation.

Lutradur printed with Digital Ground and TAP

Lutradur printed with Digital Ground and TAP

This time, the print on the right is the TAP transfer, and the other one I printed using Digital Ground.

Another difference is how the back of the wing looks.  In this photo, the back of the swallowtail wing on the right is the TAP transfer. As you can clearly see, the image is much more visible from the back than the one on the left, the DG print.

Back of swallowtail wings on lutradur

Back of swallowtail wings on lutradur

Another difference I can’t photograph is how the wings feel.  TAP transfers are made of polymer, and the wing just feels a bit thicker than the DG print.

I haven’t priced out the difference in using TAP and DG, but in terms of time and effort, using the TAP is easier and quicker because coating the lutradur with Digital Ground takes longer to do and is more work than just ironing on the TAP.

Overall, I would choose one or the other method depending on what I wanted my end result to be. The main benefit of the TAP is that you can just print it and iron, no need to prepare the lutradur. However, the resolution of my images is extremely important to me.

I’m starting to post some earrings I’ve made from the wings on my artfire or etsy store, if you’re interested in checking them out.  I also have an online class that will teach you how to print on lutradur yourself.

Transfer artist paper on lutradur

Some people on the inkjet transfer yahoo group (inkjet_transfers@yahoogroups.com) were wondering about using Transfer Artist Paper (TAP) on lutradur.  Lesley Riley’s new book on lutradur says that TAP works on lutradur (and she invented TAP, so she should know!)  Since I’m having such a great time experimenting with lutradur,  I had to try these two interesting products together. I picked one of my current favorite photo collages as my first attempt.   I took a photograph of koi swimming in a pond at the San Francisco Flower and Garden Show, and blended it with my photograph of a bonsai wisteria tree. This is the digital image:

Koi and wisteria collage

Koi and wisteria collage

I printed the image on TAP using the recommended settings (media set for plain paper, resolution at fine quality).  The TAP print looked great, pretty much what like the image looks like on treated inkjet paper. I cut an untreated piece of lutradur inches larger than the image, because if it turned out well I figured I might do something fun with the edges, like use a heat gun to curl them.

I heated my iron to the highest setting.  I put the lutradur on my ironing surface, which is relatively hard and not as padded as a normal ironing board.  I cut the excess TAP from the edges of the image, as recommended. I positioned the TAP printout face down onto the lutradur, and placed a piece of parchment paper on top of the TAP. Pressing down firmly, I held the iron in place for about 10 seconds, then moved the iron to another spot until I had covered the entire surface. I peeled up an edge and saw that it had transferred completely. I checked the other edges and had to place the TAP down and re-iron a few spots.

After making sure the entire transfer had adhered, I peeled the TAP paper off.  I think the transfer is beautiful! The color and resolution are nearly as perfect as an inkjet paper print. I love the way the translucency of the lutradur allows light to shine through the image, and how the filaments and texture complement the image. I also think the abstract nature of the image, with its rich tones, worked really well on the lutradur.

This is the result:

Koi and wisteria on lutradur

Koi and wisteria on lutradur

This is a closeup of the bottom left edge, to show the filaments and texture of the lutradur, and how well the rich color transferred:

Closeup

Closeup

And another closeup of part of the transferred image:

Closeup

Closeup

I think if you pick the image carefully, a TAP transfer to lutradur is a great option. I’m not sure how well fine details will transfer, but I think that this abstract image with its rich colors worked great.  Considering that in order to print this image directly onto the lutradur I would have to coat it with Golden’s Digital Grounds (see my other blog posts on that subject), using the TAP was certainly quicker and easier.  When I decide how to finish the piece I’ll post an update.

Printing with Golden’s Digital Grounds on Lutradur

I made a blended photo collage from my photographs of a hen’s feather and a white phalaenopsis orchid. The end design is abstract, although you can see the feather shape repeated three times in the center of the piece. I shifted the colors to get subtle golds and shades of blue.

Phalaenopsis and feather collage

Phalaenopsis and feather collage

I prepared a piece of lutradur for inkjet printing by coating it with Golden’s Digital Ground matte (see my posts about lutradur and digital ground), and printed the collage. I backed the print with thick Pellon interfacing, and sewed along some of the lines of the image.

This is the printed/quilted piece (it’s 5 by 7 inches):

Phalaenopsis and feather collage

Phal/feather collage on lutradur

This is a closeup of part of the lutradur print, to show the quilting:

Phal/feather collage printed on lutradur and quilted

Phal/feather collage printed on lutradur and quilted

I decided to finish the lutradur print by mounting it to a 9 by 12 inch canvas board.  To enlarge the phal/feather image so it would fill the blank portions of the board, I printed segments of the image on Transfer Artist Paper (see my posts about TAP).  I transferred the segments to the canvas board with my iron set on the cotton setting.

Phalaenopsis and feather collage

Phal/feather collage, TAP on canvas board

This is a closeup of one of the corners.  The TAP transfer to the cotton board resulted in a pleasing texture, and the abstract nature of the design worked well with the transfer, I think.

Phalaenopsis and feather collage

Phal/feather collage - TAP on canvas

When the weather permits, I will spray the piece with fixative (probably Golden’s new archival varnish because that was designed for use with digital grounds prints).

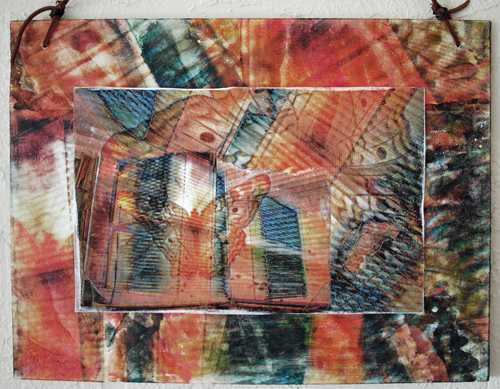
The end piece, with the lutradur adhered to the center of the canvas board, will look like this:

Phal/feather collage, lutradur and TAP on canvas

Phal/feather collage, lutradur and TAP on canvas

To hang, I will probably drill two small holes near the top of the piece and string with metal chain.  Alternatively, I might put the piece into a frame.    I finally decided how to hang the piece!  I  drilled two small holes near the top.  I wanted to reinforce the holes, but normal eyelets aren’t long enough to go through the canvas board and grab onto the other side.  The only grommets I could find were much too large for the effect I wanted.  I finally found some slightly longer eyelets and set them.  I debated stringing decorative chain or wire, but dug out some raw leather cord I have, and decided it worked well with the tone of the piece.  I’m very happy with it now, see what you think.

Upper corner of piece with leather cord as hanger

Upper corner of piece with leather cord as hanger

Completed piece, with leather cord as hanger

Completed piece, with leather cord as hanger