Save the Date! Holiday Gift Sale & Art Show

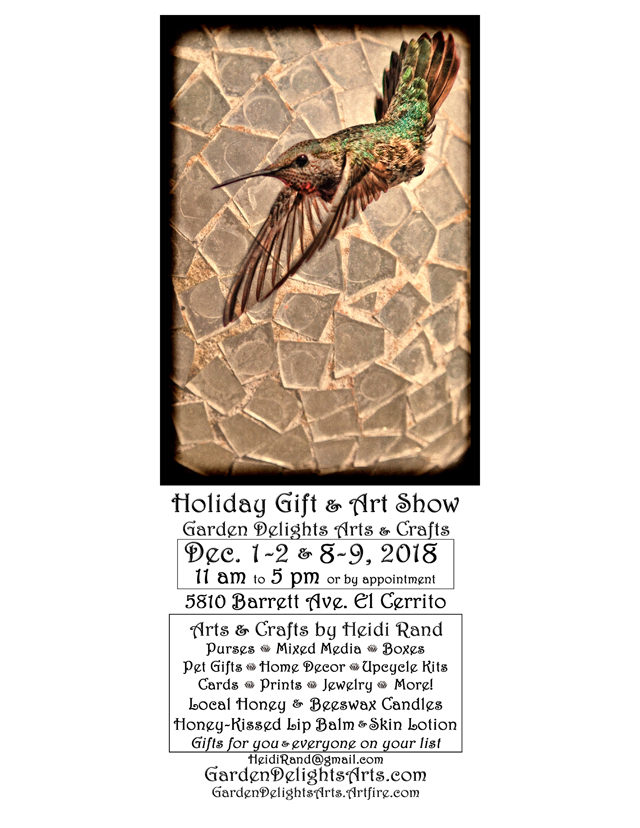
My yearly gala, the Garden Delights Holiday Gift Sale & Art Show, will be the first two weekends of December, so please save the date! If you want a postcard reminder sent to your mailbox email me your address.

The Show is at my art studio on December 1-2 and 8-9, from 11 am to 5 pm (or by appointment).

Studio

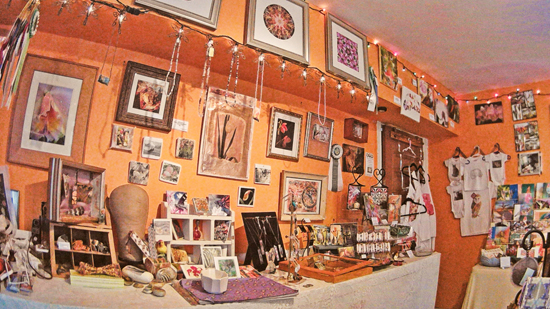
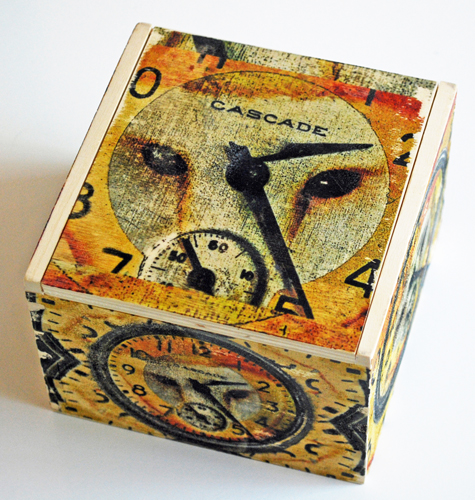
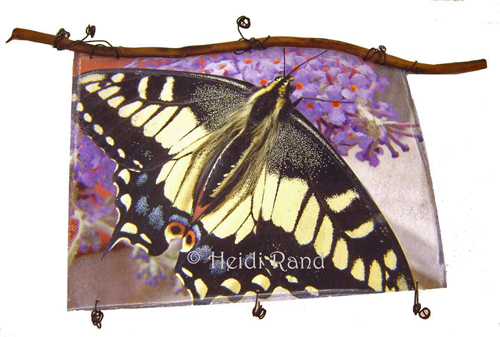
I’m so proud to show off my new photos, designs, and mixed-media artwork and crafts, and just as excited about my upcycled creations, where I bring fresh life to paper and fabric destined for landfill.

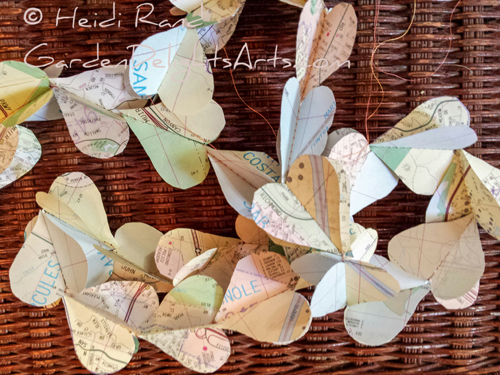
Come see my handmade bracelet cuffs, purses, phone and e-reader holders, all from fabric books and silk neckties; and envelopes and other paper crafts I make from outdated calendars and books. I’ve also been busy assembling kits and supplies for paper and fabric artists and crafters, ideal as a gift for yourself or for anyone who loves to create mixed-media, collage, book, and mail art.

Upcycled garland

Stop in to relax during the holiday rush, enjoy snacks, and chat. Never any pressure to buy, but if you’ve got a list you’ll find a wide range of handmade and original-designed gifts (for yourself and for friends and family – including pets), at all different prices.

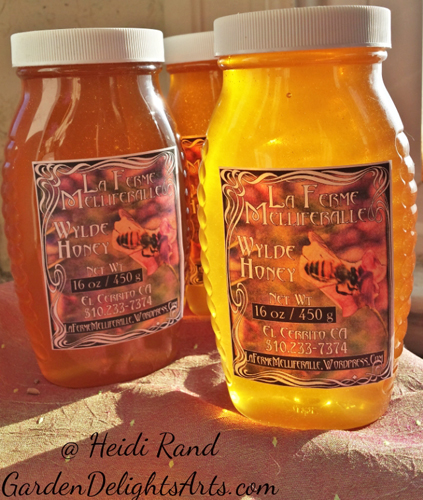
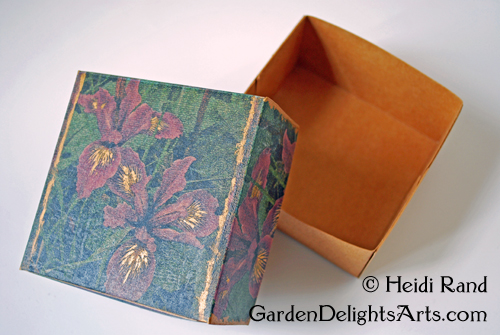
Jewelry, wearable art, purses, cards and prints, boxes, home decor, books, beeswax candles, and more! Our honeybees blessed us with a great harvest of delicious honey, which many people swear help their pollen allergies.

Local honeyAnd a new batch of soap – plus Honey Kissed lotion and lip balm, handcrafted by George from our honey and wax!Honey kissed

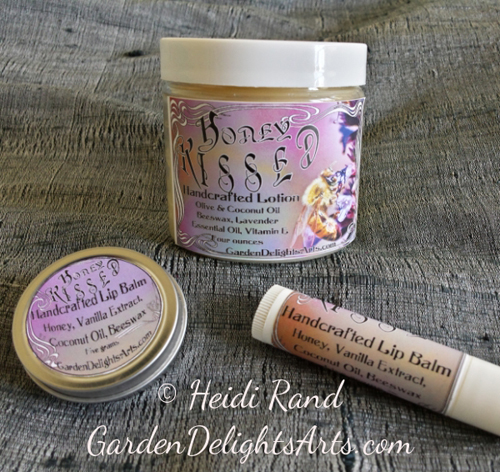
Can’t make the show or want to see my artwork online? Click these links:

Website

Artfire Gallery

My blog

Zazzle shop

Facebook

Continuing Adventures with Kraft Tex

Last week I showed you my first project with the new art material, natural color kraft•tex, and promised to let you know how I finished the envelope purse that I decorated with my orchid image.

I’m a bit nervous about using snaps, since even using a fancy snap-attaching gizmo I’ve had some failures. I was so happy with the piece that I didn’t want to ruin it. After realizing that if my snap-attaching went astray I could cover the flub up with a button, I got out the gizmo. Happily, it worked fine!

Kraft tex envelope purse

I’m still mulling over what kind of strap or handle to add, so stay tuned for the next step in this continuing saga. For my second kraft•tex project, I wanted to make a box. The sturdiness of kraft•tex makes it ideal box-worthy material. I used an envelope and box-making scoring board, but you can easily make this box without one. For the top and bottom of a nesting box that ends up measuring 4 x 4 x 2 inches, start with two 8-inch squares. With a ruler and a bone folder or the dull side of a butter knife, score the bottom of the box first, making four scores at 2 inches in for each side of the box. The top of the box needs to be a little looser to fit over the bottom, so subtract an eighth of an inch from each of the four scores.

I designed the box using my painterly photo of a Douglas Iris that George grew for me. To decorate the top part of the box, I sized one image at 4×4 inches, and then cropped four slices of the image for the sides at 4×2 inches. I flipped the images horizontally and printed on a sheet of Transfer Artist Paper (TAP). Here you can see the box after I transferred the TAP to the top and four sides.

Iris kraft tex box

You’ll always get a more vibrant transfer to a white substrate, and I knew that the natural color kraft•tex would darken the transfer. I included another sheet of untransferred TAP printed with the same images for you to see the difference.

To assemble your box, cut slits on all four sides (in the picture above, the slits are at one side of each of the small rectangles that form each corner, which have no image transfer). Fold the corners to the inside and adhere. I used double-sided tape, but you can use glue, paste, or your favorite adhesive. I chose to leave the bottom the beautiful natural tan color of the kraft•tex.

Iris kraft tex box

You can paint on top of TAP transfers, so I added touches of gold paint to bring out the wonderful golden yellow color at the center of the iris petals. I also streaked some paint down the sides of the image and at some corners of the box. Here’s a closeup.

Iris kraft tex box closeup

I love making boxes, and always try to make one when I find new art materials. I think kraft•tex is ideal for boxes and other structural projects where its sturdiness makes it easier to work with than paper or fabric which you’d have to stiffen or back with stabilizer.

There’s still time for you to sign up for my free demonstration of TAP, Lutradur (and a bit of kraft•tex) next Saturday March 15th at Flax Art & Design in San Francisco. I’ll have the box and envelope purse there for you to see in person! Click here to read my blog post with all of the details. 

Kraft Tex Envelope Purse

Ah, isn’t a thrill to get your hands on a new art product? Playing around to figure out its best qualities, how to use it with other products and with your images and designs … doesn’t that get your creative juices flowing?

I got a roll of natural color kraft•tex, from C&T Publishing (black and white coming soon). C&T describes kraft•tex as a “tough, touchable new paper that combines the best of leather and fabric.”  You can sew, and even wash it!

I’m a bit mail-art obsessed recently, so I decided to make a clutch purse in an envelope design. Rather than print directly onto the kraft•tex I wanted to try it with Transfer Artist Paper (TAP). Transfers usually work best on white or very light backgrounds, and I thought I’d check out how well the natural tan color of the kraft•tex would take a transfer.

I spent a blissful day last weekend photographing orchids at the Pacific Orchid Exposition, and got a striking closeup of a paphiopedelum, which I altered for a painterly effect. I thought the rich colors would blend nicely with the kraft•tex. This is the image:

Paphiopedilum orchid design

I re-sized it to fit onto the front of the purse and flipped horizontally so it would transfer with the orientation I wanted – this matters most for text, of course. To fill the rest of the sheet of TAP I designed a kaleidoscope from the original image and tiled it to transfer to the inside of the purse. This is the single tile:

Paphiopedilum orchid kaleidoscope

Next, what about the back? The four flaps of the envelope overlap, so I didn’t want to use a single image. I took a portion of the original image, resized it smaller, and tiled it onto a full sheet.

Paphiopedilum orchid sheet
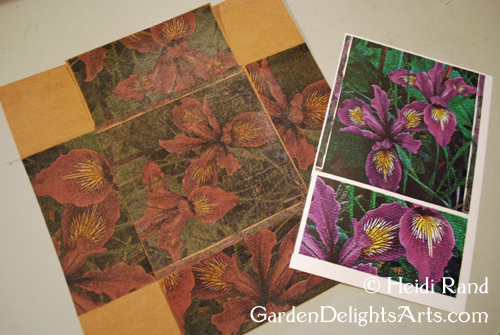
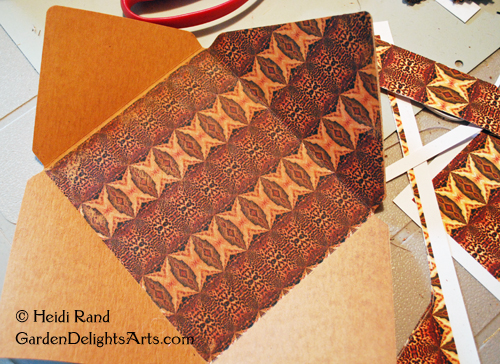
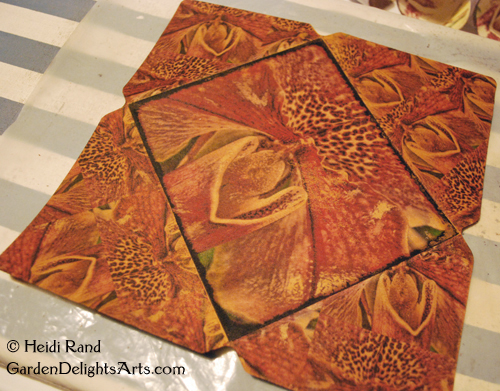
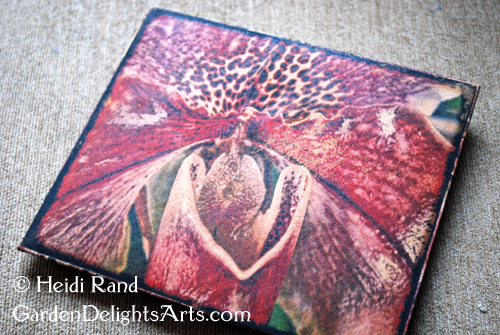
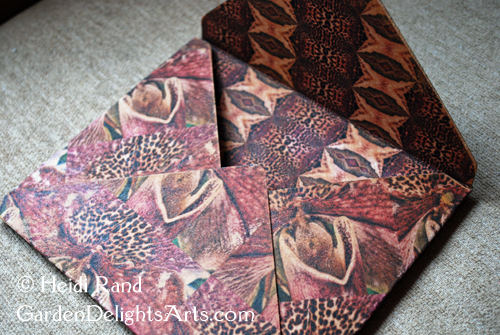
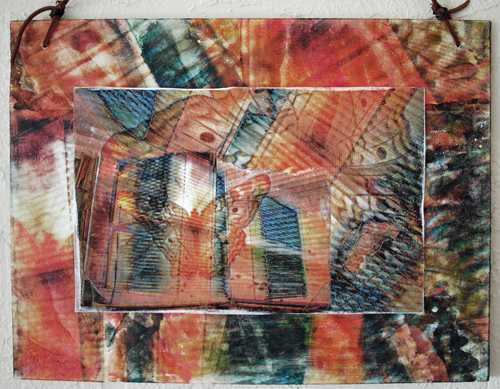
Finally it was time to transfer! TAP works best at the highest iron setting that the surface you’re ironing onto can withstand, so I set it on linen. Taking the front piece first, I cut out closely around the image, placed it face down onto the kraft•tex, covered it with parchment paper to protect the iron, and slowly circled around the entire piece with the iron.

Paphiopedilum envelope front

I was very happy with how it turned out, so moved on to transfer the inside piece.

Paphiopedilum envelope inside

Small details and lines in an image never show up as well in a transfer as on a direct print, but I have come to accept that as the tradeoff for the ease of using a transfer rather than treating a surface for a good direct print.

Finally, for the back, I cut pieces of the TAP sheet roughly to size and transferred them one at a time to each flap.

Paphiopedilum envelope back

Drum roll please .. here’s the front of my kraft•tex Paphiopedilum Orchid Envelope Purse!

Paphiopedilum envelope purse

And the back:

Paphiopedilum envelope back

I’m plotting what kind of closure to use. Probably something involving fabric. Stay tuned!

Oh – and I’ll be demonstrating TAP and Lutradur (and, it turns out they want me to also demo kraft•tex) on Saturday March 15th at Flax Art & Design in San Francisco. Free! Click here to read my blog post with all of the details.

Have you used a new art product lately? Please show and tell!

Transfer This! Free Workshop at Flax Art

I’m beyond excited that Flax Art & Design, the fabulous art store in San Francisco, is having me put on a free workshop demonstrating my favorite products, Transfer Artist Paper (TAP) and Lutradur!

I’ve told you about both products in many blog posts (see my list below). TAP is my go-to heat transfer paper, the best I’ve ever used. TAP allows you to easily transfer crisp, colorfast and washable images to almost any surface with your household iron. You can inkjet print, paint, stamp, or draw images onto TAP for a variety of amazing effects.

Owl wooden box

Lutradur, which I’ve also written extensively about, is a spun-bonded polyester that combines the best qualities of fabric and paper. It’s a fantastic medium for mixed media as well as for artists looking to add a new level of texture to their work.

Lutradur butterfly hanging

I’m a demonstrator and teacher for C&T Publishing,makers of TAP and Lutradur. In this free 2-hour lecture/demo at Flax, I’ll show you the entire process – from creating an image on TAP to successfully transferring it to Lutradur. I’ll bring a wide variety of samples to show you the endless potential that these two products make possible, and to spark your creativity and imagination.

Lutradur and TAP butterfly window hanging

The free workshop is March 15th, from 1 to 3 pm. Space is limited, so sign up today to reserve your spot! Call Flax Art & Design at 415.552.2355, or click here to sign up online.

Want to know more?

Check out my book: Inkjet Printing on Lutradur.

CraftArtEdu class: Inkjet Printing on Lutradur.

CraftArtEdu class about using TAP and other heat transfers onto wood.

And here’s a list of my blog posts about Lutradur and TAP:

Egret in flight lutradur art quilt

Transfer artist paper on lutradur

Photos on wooden boxes

Evolon and Transfer Artist Paper

Transfer Artist Paper on cotton

Digital collage on art board

Image Transfer to Wood

More on lutradur, Digital Ground and TAP

Wingspread Mixed-Media Art Doll

Printing with Golden’s Digital Grounds on Lutradur

Butterfly Bliss mini-art hanging

Inkjet Heat Transfer workshop

Explore a creative and fun way to put your photos, artwork, and designs onto a variety of surfaces using heat transfers and an inkjet printer. At this hands-on workshop we’ll  use several different products to transfer your images onto fabric, wood, tile, and more. You’ll complete at least one transfer at the workshop, and a handout is included so you’ll be all set to make original gifts and artwork on your own.

Collage box

Hummingbird and Watch Collage Box: Transfer Artist Paper

The workshop will be held on Sunday April 28, from noon to 3 pm at The Village Shops and Galleries, 10330 San Pablo Ave., El Cerrito (between Stockton and Eureka). Free parking and wheelchair accessible. $40 plus a materials fee.

Swallowtail butterfly tile

Swallowtail butterfly tile

This is a versatile, clean, and inexpensive way to place your photos and images onto things that you can’t fit through your printer. I’ll show you tips and tricks to get great results from transfers, and introduce you to the best-quality products, including Transfer Artist Paper (TAP), which I used to make the collage box in the photograph at the top of this post.

Another heat transfer product I like is made by Lazertran, a company that makes the waterslide decals I use in many of my art pieces.  The top of this box is a Lazertran heat transfer.

Lisianthus box heat transfer

Lisianthus Box: Lazaertran transfer

Want to learn more? Here are some of my blog posts about using heat transfers:

Photos on wooden boxes, part 1

Photos on metal, part 1

Photos on tiles, part 1

Photos on tiles, part 2

Pre-registration is required for the workshop because I’m limiting the size, so please email me at heidirand@gmail.com.  For the complete list of my workshops and other events, go to the workshop page on my website.

If you’re not in the Bay Area, you can learn the techniques at my online workshop at CraftArtEdu, Decorating Wood With Image Transfers.


Image Transfer to Wood

I’m putting the finishing touches on my latest online class for CraftArtEdu, which is all about using heat transfers to decorate wood with your own images.

Pocketwatch owl boxUsing inkjet heat transfers (also known as t-shirt transfers) is my favorite transfer technique for wood. It’s easier than most other techniques, the results are usually more predictable, and it doesn’t require special equipment or obnoxious chemicals.

Transfer to wood veneerThere are a lot of different inkjet transfer products. I usually use Transfer Artist Paper (TAP) or the Epson iron-on  paper (using the brand manufactured for your printer gives better results than most of the generic products). You can experiment, printing the same image onto two different brands of transfers.

Reverse your file

The first rule of transferring is to reverse your file. There are some exceptions, but for most transfer processes you place the transfer face down onto your surface, so you need to flip the image.

In the class I go step by step through the process, give you lots of tips and a troubleshooting guide, and discuss many different iron-on products. I’ll let you know when it’s finished and live on CraftArtEdu.com.  Have you used heat transfers onto fabric or any other surface? Ever try it on wood? Let me know what you think! If you’re interested in seeing a preview of the class, click here.

Evolon and Transfer Artist Paper

I’ve had a swatch of Evolon laying on my worktable for months, but hadn’t worked up the courage to do anything with it. Evolon is a microfiber fabric made by the company that makes Lutradur. Like Lutradur, it has a lot of industrial and practical uses, but artists and crafters have seized on both of these products to use for our own nefarious purposes. Evolon isn’t readily available in the US yet. I found one online source, Meinke Toy, but alas, the owner is giving up the business. Hopefully she’ll decide to find a buyer rather than completely close the store down. As she describes it, “Evolon is a nonwoven microfiber material made of nylon and polyester. You can paint, dye, print and heat distress Evolon. It will not fray when cut with a scissors and can also be cut using a soldering iron. It excels as a base for stitch, by hand or machine and works well layered with sheer elements above it.” It comes in Soft, which feels a bit like chamois, and Regular, which feels like a leather-like paper. I love the feeling of both of them.

Anyway, finally having a free minute to do a small project, I decided to try out the Evolon. I printed one of my favorite photographs of a hovering hummingbird onto Transfer Artist Paper (TAP), my favorite heat transfer paper. This is the photo:

Hummingbird hovering

Whenever I print on TAP I make sure to fill up the whole page so I don’t waste any of it (it’s not cheap), so I added a row of one of my new kaleidoscopes, which I made from my photo of a black and white feather. After I kaleidoscoped the image using Kaleider, I played with the colors for a psychedelic effect. This is a single tile of the kaleidoscope:

Feathers wild kaleidoscope

It’s best to use TAP soon after printing it — if you can’t, put it back into the sealable plastic bag that it comes in. I headed right down to my studio and ironed the hummingbird onto the Evolon. I set the iron for the polyester setting, but didn’t hold it on the surface for too long. The transfer worked great, going on really smoothly except for a few bits here and there, which added an uneven effect that I like. Then I cut up pieces of the kaleidoscope and ironed it around the edges as a frame. I ironed the Evolon to a piece of stabilizer for a backing, and sewed around the edges. Finally, I stitched on a hen’s feather. This is the piece:

Evolon Hummingbird HoveringNot sure yet how I’m going to mount or hang it. I’m just enjoying having it here to look at and feel. Really love the smooth, leather-like texture of the Evolon.

I know I didn’t take full advantage of Evolon’s special properties, I just wanted to see how it took the TAP. Next experiment, I’ll coat it with Digital Ground or inkAid and print directly onto it. Now, that’s REALLY my idea of fun!

Wingspread Mixed-Media Art Doll

Wingspread Art Doll

Wingspread Art Doll

Meet “Wingspread,” a mixed-media art doll that I created, using several different techniques to transfer or attach my original photographs and designs to the soft stuffed cotton doll. Most of Wings’ body is decorated with fragments of my Golden Butterfly” photo collage. I used Transfer Artist Paper (TAP) to transfer the Golden Butterfly design to the doll.

Wingspread Art Doll - back

Wingspread Art Doll - back

Here’s Wingspread’s back.  The back of her (his?) head is a TAP transfer of my mandala design that I made from my photos of a monarch butterfly wing and a peacock feather.   This is the image:

And here’s a closeup of the wings on the back:

Anise swallowtail butterfly wing on lutradur

For the large wing on the right side I printed my photo of an anise swallowtail butterfly’s spread wing on lutradur coated with Golden’s Digital Ground. I stitched the wing to the center of the back. I also added a small metal wing, and a dangle of pearl, metal and glass beads.

Wingspread’s headdress is made from beautiful black and white striped hen feathers from Barred Rock hens. They are affixed to the head through another piece of lutradur, which I printed using my photo collage of the open wing of a Barred Rock hen.

Wings wears a colorful bowtie, which I made from my original design fabric.

Wingspread is a bit over 20 inches tall, including the feather headdress.  I love art dolls, and it was so fun to make this one, incorporating my butterfly photos and designs, and using so many different techniques and products.   You can see more pictures at my Artfire gallery.  Have you ever made an art doll?  What materials did you use?

Inkjet Transfer Techniques Workshop

One-day workshop :  Saturday July 17, 2010

Noon to 4:00 pm at Canyon Trail Park & Art Center, 6757 Gatto Ave., El Cerrito.  $45 plus materials

Butterfly window hanging

Butterfly window hanging, Transfer Artist Paper

We will explore using inkjet transfers to enhance your artwork and to create mixed media, collage and other works.  Learn several techniques to transfer images and text to a variety of surfaces.  Transfers are ideal to get your images and designs onto surfaces that you can’t fit through your printer.  We will experiment with many different products, including a new heat transfer polymer material, Transfer Artist Paper.  You will complete at least two transfers at the workshop.

Double exposure on canvas

Double exposure on canvas, heat transfer

Pre-registration required.  For more information, or to pre-register, email me at heidirand@gmail.com.  If you can’t make the workshop, email me for other options, including private classes.

Lisianthus box lazertran heat transfer

Lisianthus box lazertran heat transfer

Inkjet Heat Transfer Techniques : One-day workshop

Learn to make creative and unique artwork, crafts and gifts using heat transfers and your inkjet printer. We will explore several products and techniques to transfer images and text to a wide variety of surfaces. You will complete at least two transfers at the workshop.

Masdevalia orchid box

Masdevallia orchid box

Sunday February 21, 2010, noon to 4.  Canyon Trail Park & Art Center, 6757 Gatto Ave., El Cerrito. $40 plus materials

Swallowtail butterfly tile

Swallowtail butterfly tile

You can use heat transfers on fabric, wood, tile, metal, and many other surfaces.  It’s a versatile way to place your photographs and images onto things that you can’t fit through your printer!  For best results, I usually recommend using the  iron-on transfers that your printer manufacturer offers.  There is an exciting new product though, Transfer Artist Paper (TAP), that works very well for transfers.  You’ll have a chance to try TAP at the workshop. I made the frame for this lutradur piece with TAP transferred onto a canvas board.

Butterfly window collage lutradur and TAP

Butterfly window collage lutradur and TAP

Another heat transfer product I like is by Lazertran, the company that makes the waterslide decals that I use in many of my art pieces.  The top of this box is a lazertran heat transfer.

Lisianthus box heat transfer

Lisianthus box heat transfer

Here are some of my blog posts about using heat transfers:

Photos on wooden boxes, part 1

Photos on metal, part 1

Photos on tiles, part 1

For more information, or to pre-register, email me at heidirand@gmail.com.   For the complete list of my workshops and other events, go to the Calendar on my website.