NATURE + ART workshop

Join me in this hands-on workshop to inspire and teach you basic and advanced techniques to enrich your artwork with natural objects and images, including flowers and plants, and animals and wildlife.

I’m limiting enrollment in this workshop, and molding it to the interests of the participants. We can cover topics such as improving your nature photography, using nature in mixed media art, how to find natural subjects or attract them to your garden, and much more.

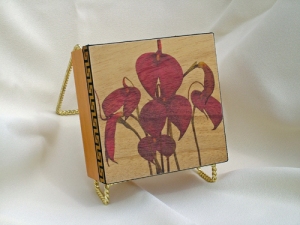
Masdevallia orchid box

Masdevallia orchid box

No equipment is required, but if you have them, bring along your digital camera and/or laptop computer (including iphone or tablet).  Or bring your favorite paints, pencils, pastels, etc.

Sunday June 19, 2011, noon to 4:00 p.m., $60 plus materials. At the El Cerrito Canyon Trail Park Art Center.  Pre-registration is required. If you have questions, or to register, please email me at heidirand@gmail.com

And click here for the complete list of my upcoming classes.

Crazy about irises!

My mom loved irises – they were her favorite flower, and I share her passion for them.  George finds me the most wonderful assortment of different irises, and many of them just started blooming. The tall bearded irises showed themselves first.  Here’s one of the pure white, just starting to open.

Bearded iris

Bearded iris

And voila! The luxurious white petals are fully open, just a tinge of yellow on what I recently learned is called the beard, hence “bearded iris” (or one official source I found called it “the fuzzy line”) …

The yellow bearded irises started opening next.  Oh, I have to tell you that these bearded irises have the most interesting scent. George and I think they smell a bit like Pez candy. It’s not overwhelmingly sweet, a little powdery and with a tinge of bitterness.

Bearded iris

Bearded iris

And a closeup of the interior petals, intriguingly striped, and the fuzzy beard, a more saturated yellow.

A very tight closeup side shot of the wonderful beard – have you ever felt one? They’re so soft!

Next the Douglas Irises started blooming.  They’re natives and are much smaller than the bearded irises.  This is one of my favorites, the purple and gold leaves are very distinctive.

Finally, this dutch iris is still bundled tight.  It’s a cold but sunny morning, so maybe it will warm up and I’ll be able to show you the bloom later this weekend.

Dutch iris

Dutch iris

Whoo-ha! It bloomed, and so here it is ..

Some more photos to add! This is one of my all-time favorites, it’s a Pacific Coast Iris.

The outer petals are the most amazing rich burgundy color, with veining of dark gold.  Here’s a closeup of the flower.

Any irises coming up in your garden?  Tell me your favorites!

Garden Design Fabric Bowties!

I have gone bowtie crazy!  George has been after me for years to make him a bowtie.  Evidently they are really hard to find and good ones are quite expensive.  Then recently an old friend asked me whether I would make her some neckties from my fabric designs. I got a McCalls pattern that had both a necktie and a bowtie.  Sad to say, I quickly realized that making the necktie was going to take more time than I had .. .  But the bowtie — now that was a different story.  It was far less complicated than the necktie, and took much less fabric.  So here’s my first effort … what do you think?  The fabric is one of my favorites, a design I made by kaleidoscoping my photograph of a purple laelia orchid.

Bowtie number one

Bowtie number one

Here’s the bowtie on the proud model, George.

George wearing bowtie number 1

George wearing bowtie number 1

Bowtie number two is also from the McCalls pattern.  I used another of my favorite fabric designs, a kaleidoscope pattern from my photograph of a butterfly’s wing.

Bowtie number 2

Bowtie number 2

How do you like it on George?   For this one I used the standard bowtie hardware, a hook and clasp and adjustable slider.  I had to order the hardware online because none of the local fabric stores carry it.  Contact me if you want information about where I got the hardware.

George wearing bowtie number 2

George wearing bowtie number 2

Here’s my third bowtie.  I found great instructions on a blog for boys’ bowties, and just made it a bit larger for a man-sized bowtie.  This is a double fold tie.  I haven’t had a chance to make the strap, so I’m using one of the bowtie clip-ons that I got when I ordered the other hardware sets.

Larger bowtie

Larger bowtie

This is the back, showing the clip-on hardware.  You just slip the gizmo through the tube at the back and clip it onto each side of the shirt collar.

Back of bowtie showing clip-on

Back of bowtie showing clip-on

George was too tired to put on the shirt to model it, but I got some shots of him holding it up to his t-shirt. Here’s one:

Mr. Bowtie

Mr. Bowtie

And another … !  I figured out how to print the fabric for this design using letter-sized sheets of fabric, so I can whip up the bowties rather than waiting for yardage to be printed for me.

Honeybee design bowtie

Honeybee design bowtie

This is a closeup of the center loop

Honeybee design bowtie center piece

Honeybee design bowtie center loop

This is the original file I used – my photograph of honeybees in a hive, kaleidoscoped into this design:

Honeybee kaleidoscope design

Honeybee kaleidoscope design

Tired of bowties yet?  Okay, just one more.  My latest is made of fabric I designed from my photograph of a swallowtail butterfly wing.  I kaleidoscoped a small part of the photograph using the Kaleider software program (see my other blog posts about Kaleider).  I love how brightly colored the fabric turned out —

Swallowtail bright bowtie

Swallowtail bright bowtie

I just started showing the bowties in my Etsy store.  Click here for my first listing. I can also make them to order from any of my fabric designs, so contact me if you want to special order one.

Online art classes at CraftEdu — coming soon!

I’m always amazed to find that even as I reach out over the internet to people all over the world in places I’ll never be lucky enough to visit .. that it really all comes down to personal relationships.  Grace Taormina, a talented mixed media, collage and fiber artist, and author of  The Complete Guide to Rubber Stamping and The Complete Guide to Decorative Stamping is a wonderful friend I made through our local arts group, the Pinole Artisans.

Now follow me here — Grace is friends with Donna Kato, an amazing polymer clay artist, author, teacher, and product developer.  They met in the craft industry, and would catch up when they were both doing appearances on Carol Duvall’s TV shows.  When Donna began dreaming of teaching online, rather than travelling the world and spending so much time in airports, one of the first people she contacted to take part was her friend “Gracie”.  And I’m very honored that Grace recommended me to Donna.

So, what’s it all about?  Donna describes her dream, CraftEdu, as a creative powerhouse of talent covering many art and craft media.  She selected the faculty based on expertise and ability to instruct and inspire their students, and boasts of a team of the best and the brightest the art and craft world have to offer.

After much searching, Donna found the perfect platform to offer online classes.  Created and designed by Faculte, it provides a unique alternative to conventional pdf based class presentations and creates a near in person teaching environment.   CraftEdu will launch in beta in March 2010 and anticipates an official launch in April 2010.

I’ll be teaching inkjet printing on fabric, using lutradur in your art and printing on lutradur, inkjet transfer techniques, and much more! My CraftEdu gallery is a short introduction to my artwork and the kinds of classes I will be offering.

Sign up for updates for classes with CraftEdu.com

Follow the CraftEdu blog and learn more about faculty members and events at the CraftEdu facebook page!

Inkjet Printing on Fabric Workshop

Inkjet Printing on Fabric

Workshop taught by Heidi Rand

Canyon Trail Art Center, El Cerrito California

Saturday May 22, 2010 – noon to 3:30 p.m.
$35 + materials

Lavender rust quilt

Lavender rust quilt

Welcome to the exciting world of fabric printing!  Learn to print your artwork, images and designs on fabric using your home inkjet printer.  This exciting technique opens the door to endless possibilities for creating original fabric to use in quilts, art pieces, gifts, home decor, and much more.
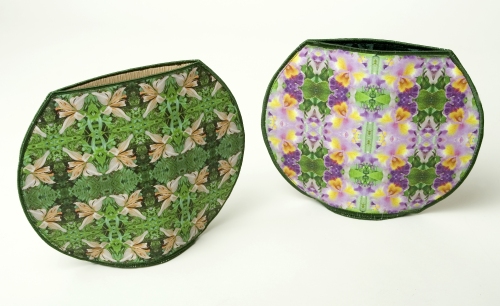
Fabric vases

Fabric vases

I take you step-by-step through the entire process, from preparing your files to print, to choosing the right fabric and getting it ready to go through the printer, to post-printing treatment, and much more.  I will discuss the importance of knowing what kinds of inks your printer uses, and give you tips to get fabric through even the most finicky printer.
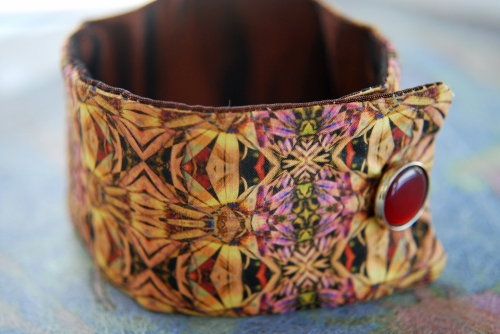
Fabric cuff bracelet

Fabric cuff bracelet

With many examples of printed fabric and fabric artwork and crafts, you’ll get new ideas about what to do with your images and designs, and the knowledge to go home and start printing your own!

Pre-registration required.  Please email me at HeidiRand@gmail.com

Upcoming workshops:

Saturday June 19, 2010, noon to 4. Art quilts and fabric hangings. El Cerrito Canyon Trail Art Center

Saturday July 17, 2010 noon to 4:00 p.m.  Inkjet transfer techniques. El Cerrito Canyon Trail Art Center

Sunday August 29, 2010, noon to 3:30 p.m. Photo Art : Altered Imagery. El Cerrito Canyon Trail Art Center

Sunday September 19, 2010, noon to 4 p.m. Beyond paper : inkjet printing on alternative surfaces.  El Cerrito Canyon Trail Art Center

Sunday October 24, 2010, noon to 3:30 p.m.  Exploring lutradur.  El Cerrito Canyon Trail Art Center

Sunday November 21, 2010, noon – 3:30 p.m.  Handmade gifts with your inkjet printer. El Cerrito Canyon Trail Art Center

Have questions? Interested in registering?  Please email me

If you can’t make the workshop, I also have an ebook to teach you to print on fabric and online classes at CraftEdu

Inkjet Heat Transfer Techniques : One-day workshop

Learn to make creative and unique artwork, crafts and gifts using heat transfers and your inkjet printer. We will explore several products and techniques to transfer images and text to a wide variety of surfaces. You will complete at least two transfers at the workshop.

Masdevalia orchid box

Masdevallia orchid box

Sunday February 21, 2010, noon to 4.  Canyon Trail Park & Art Center, 6757 Gatto Ave., El Cerrito. $40 plus materials

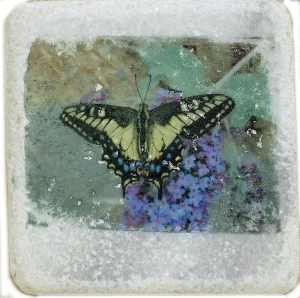
Swallowtail butterfly tile

Swallowtail butterfly tile

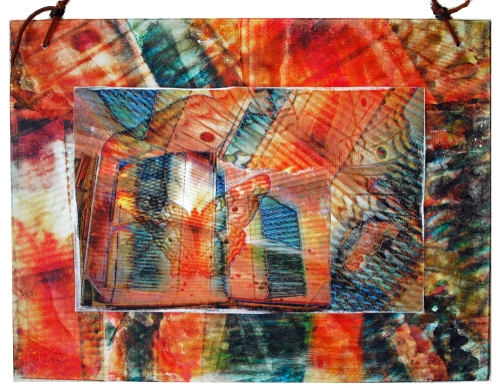
You can use heat transfers on fabric, wood, tile, metal, and many other surfaces.  It’s a versatile way to place your photographs and images onto things that you can’t fit through your printer!  For best results, I usually recommend using the  iron-on transfers that your printer manufacturer offers.  There is an exciting new product though, Transfer Artist Paper (TAP), that works very well for transfers.  You’ll have a chance to try TAP at the workshop. I made the frame for this lutradur piece with TAP transferred onto a canvas board.

Butterfly window collage lutradur and TAP

Butterfly window collage lutradur and TAP

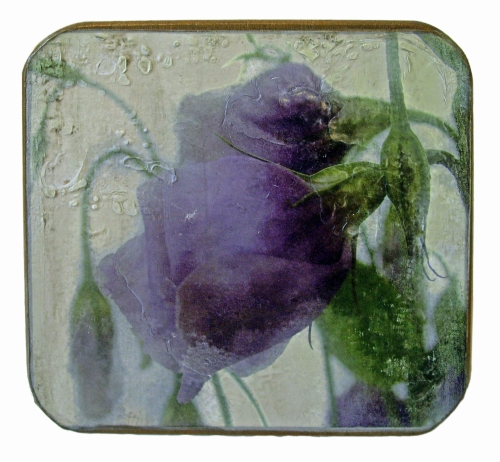
Another heat transfer product I like is by Lazertran, the company that makes the waterslide decals that I use in many of my art pieces.  The top of this box is a lazertran heat transfer.

Lisianthus box heat transfer

Lisianthus box heat transfer

Here are some of my blog posts about using heat transfers:

Photos on wooden boxes, part 1

Photos on metal, part 1

Photos on tiles, part 1

For more information, or to pre-register, email me at heidirand@gmail.com.   For the complete list of my workshops and other events, go to the Calendar on my website.


Lavender and rust art quilt – finishing and framing

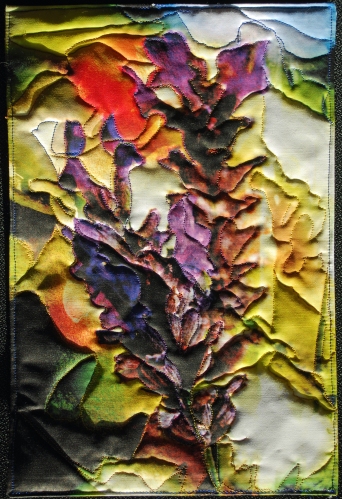
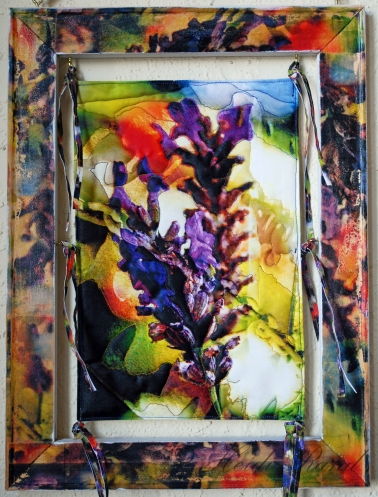
When last we met, I had printed and quilted an art quilt from a blended collage of my photographs of a lavender flower and a piece of rusted machinery.  Here’s a photo of the quilt, and this is the post about the process :

Lavender and rust art quilt

Lavender and rust art quilt

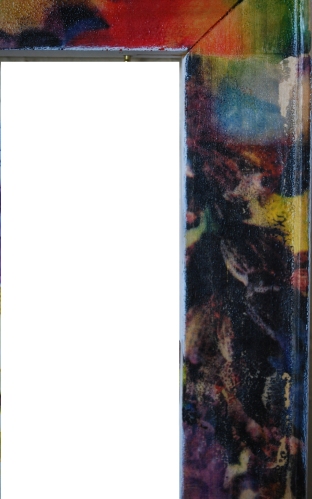
Finishing and framing a piece is always a challenge for me. Since I used new techniques and products for the quilt (more about that later!), I wanted that novelty to be reflected in the way I framed it.  Rooting around in my supply closet, I found wooden framing stretcher strips about the right size.  When assembled, the frame was a bit larger than the quilt.  To finish the plain wood in a manner that would reflect and honor the quilt, I printed some of the elements of the lavender and rust collage onto Transfer Artist Paper (see my earlier posts about TAP), and ironed them onto the front of the frame.

TAP on frame

TAP on frame

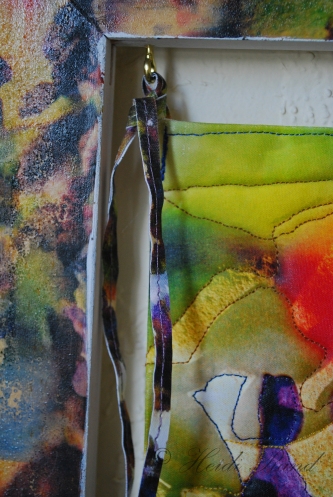
My next challenge was how to attach the quilt to the frame.  I decided to use some kind of ribbon that I would sew to the quilt and thread through screw eyes attached to the inside edge of the frame.  It’s not easy finding good screw eyes! My local fabric store didn’t have anything I liked, and I had to visit three hardware stores to find the size and color that I wanted. I put screw eyes in each of the four sides of the frame.  This is the top right edge, showing the screw eye:

Ribbon and screw eye attachment

Ribbon and screw eye attachment

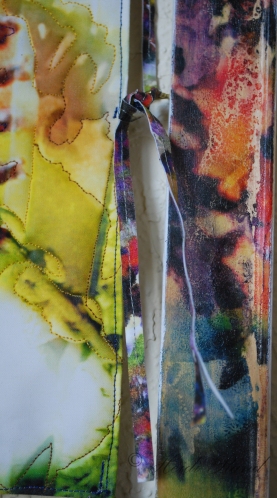
I decided that instead of using premade cord or ribbon, I would make it myself.  I started with the image that I used for the quilt and designed ribbons, but rescaled to be much smaller because the ribbon would have to fit  through the screw eyes. I printed it on the fabric that I had used for the quilt and doubled the fabric over so both sides would have a pattern.  I cut thin strips and stitched down the center of each to hold the sides together.  I threaded them through the eyes and tied knots, working with each to get the quilt centered in the frame. This is a closeup of the ribbon at the center right side of the frame:

Ribbon tied through screw eye

Ribbon tied through screw eye

And this is the quilt tied to the frame at the six eyes:

Quilt in frame

Quilt in frame

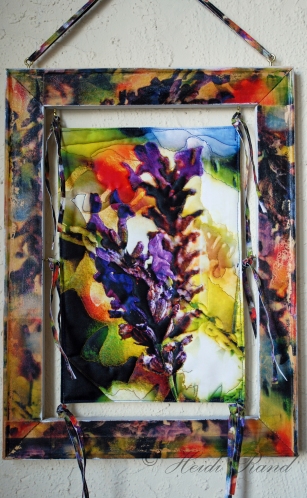
The last challenge: how to hang the framed quilt? I didn’t want to string a wire across the back because that would show through the gaps. I couldn’t use a sawtooth because the gallery that I show my work in (a plug here for the Pinole Artisan galleries) doesn’t allow those. I decided to echo the screw eyes used on the inside, and put two at the top of the frame.  I made another long ribbon, threaded it through the eyes, doubled it over and stitched it together. The framed quilt now hangs flush against the wall from a hook or nail. This is it:

Hanging framed art quilt

Hanging framed art quilt

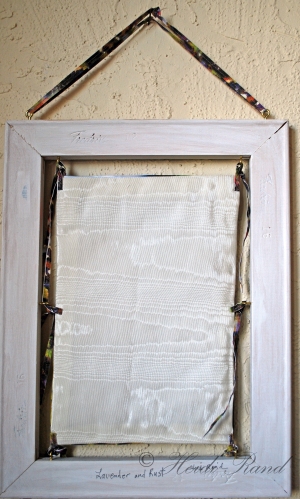
If you’re wondering about the back of the frame, it’s nothing fancy. I finished it by painting the plain wood with a few coats of white gesso.  I solved the eternal question of how to sign an art quilt (many people print labels on fabric and sew them to the back), by signing the gessoed surface with a pigment ink pen. This is how the back looks:

Back of the quilt

Back of the quilt

If you’re interested in learning how to print on fabric, check out my online class at CraftEdu.  I also offer the class with captioning for the deaf and hard of hearing.

Lavender and rust art quilt

Native Plant Fair and Sale October 10-11

Fawn lilies

Fawn lilies

The East Bay Chapter of the California Native Plant Society will host their Fourth Native Plant Fair and Sale at the Native Here Nursery, 101 Golf Course Drive in Tilden Park, Berkeley.

Other than a wonderful selection of local native plants, there will be local photographers and craftspeople with native and nature-related arts and crafts. This event is a major source of funding for the East Bay CNPS.   Over twenty people volunteer regularly at the Native Here Nursery, open year round to benefit the chapter through sales of local native plants.

Fair hours are 10 am to 3 pm on Saturday, October 10; noon to 3 pm on Sunday, October 11.
I will have a table both days with a large selection of my original arts and crafts works, including many new prints of native plants and butterflies, my fabric art, tile boxes, and much more!

P2174341b

Printing with Golden’s Digital Grounds on Lutradur

I made a blended photo collage from my photographs of a hen’s feather and a white phalaenopsis orchid. The end design is abstract, although you can see the feather shape repeated three times in the center of the piece. I shifted the colors to get subtle golds and shades of blue.

Phalaenopsis and feather collage

Phalaenopsis and feather collage

I prepared a piece of lutradur for inkjet printing by coating it with Golden’s Digital Ground matte (see my posts about lutradur and digital ground), and printed the collage. I backed the print with thick Pellon interfacing, and sewed along some of the lines of the image.

This is the printed/quilted piece (it’s 5 by 7 inches):

Phalaenopsis and feather collage

Phal/feather collage on lutradur

This is a closeup of part of the lutradur print, to show the quilting:

Phal/feather collage printed on lutradur and quilted

Phal/feather collage printed on lutradur and quilted

I decided to finish the lutradur print by mounting it to a 9 by 12 inch canvas board.  To enlarge the phal/feather image so it would fill the blank portions of the board, I printed segments of the image on Transfer Artist Paper (see my posts about TAP).  I transferred the segments to the canvas board with my iron set on the cotton setting.

Phalaenopsis and feather collage

Phal/feather collage, TAP on canvas board

This is a closeup of one of the corners.  The TAP transfer to the cotton board resulted in a pleasing texture, and the abstract nature of the design worked well with the transfer, I think.

Phalaenopsis and feather collage

Phal/feather collage - TAP on canvas

When the weather permits, I will spray the piece with fixative (probably Golden’s new archival varnish because that was designed for use with digital grounds prints).

The end piece, with the lutradur adhered to the center of the canvas board, will look like this:

Phal/feather collage, lutradur and TAP on canvas

Phal/feather collage, lutradur and TAP on canvas

To hang, I will probably drill two small holes near the top of the piece and string with metal chain.  Alternatively, I might put the piece into a frame.    I finally decided how to hang the piece!  I  drilled two small holes near the top.  I wanted to reinforce the holes, but normal eyelets aren’t long enough to go through the canvas board and grab onto the other side.  The only grommets I could find were much too large for the effect I wanted.  I finally found some slightly longer eyelets and set them.  I debated stringing decorative chain or wire, but dug out some raw leather cord I have, and decided it worked well with the tone of the piece.  I’m very happy with it now, see what you think.

Upper corner of piece with leather cord as hanger

Upper corner of piece with leather cord as hanger

Completed piece, with leather cord as hanger

Completed piece, with leather cord as hanger

Photos on metal, part 1

I love using metal in mixed media works: beads, wire, wire mesh, metal embossed with designs or letters, brads, etc. …..   I used a couple of different techniques on this box:

Hidden treasure box

Hidden treasure box

The box has strips of copper sheeting on the top and bottom front which I embossed using a stencil.  The word “hidden” along the side is metal mesh which I embossed using metal letters.  I also put metal letters spelling “treasures” along the right side.  The image is a heat transfer of a double-exposure photo I took of myself awhile ago (pre-digital, when double exposures were harder but really fun).

Ah, but photos on metal — so many possibilities, but also difficult.

I started out trying some inkjet lazertran on metal.  I got a few rolls of copper and aluminum sheeting made by Artemboss.  You can find it at Michael’s, but I got it at a better price through misterat.com  This metal is soft enough to cut easily and I really like working with it.  I didn’t have much success with the lazertran, unfortunately.  With inkjet lazertran, if you want the surface of your substrate to show through where your image would be white, you have to clear the white with either turpentine or a substitute.  My aim in putting a photo onto metal would be for the surface to show through, so I did need to use the turpentine.   My results weren’t good – my edges curled, I used too much turpentine and some of the image dissolved, the end image was kind of chalky. 

I next tried using a heat transfer, the same t-shirt transfer material I wrote about earlier for putting photos onto tile.  I use Epson transfers with my Epson 2400 pigment printer.  The results were much better than the lazertran.  Here’s an example:

White phalaenopsis orchid

White phalaenopsis orchid

This is an Artemboss copper sheet with a heat transfer of my photo of an orchid.  I worked with the image so it’s softer than a straight photograph.  The heat transfer process doesn’t work well with sharp detail, so I chose a soft image, and I like the effect here.  The colors of the heat transfer aren’t as saturated as a straight photo, but here my aim was the contrast between light and dark, and that worked fine for me.  I also did some random embossing on the metal sheet and then attached it to a piece of wood with nails.
To print my transfer, I reversed the image (there wasn’t any type or lettering, but I decided to keep the orientation as I had shot the image).  I used the matte black ink and the enhanced matte paper and “best” settings.  I set the metal sheeting on a hard even surface (not an ironing board) and set the iron on its highest setting (don’t have water in the iron).  You really need some heat-resistant gloves to handle the metal, because it gets very hot.  Place the heat transfer face down on the metal, exactly where you want it — any movement will blur the image.  I put a sheet of baking parchment between the iron and the transfer, and held the iron down in one spot for a few moments.  Don’t move the iron – pick it up and place it on another spot next to the first spot.  If your iron has holes in it, make sure you’re overlapping so you don’t leave any spots untransferred.

It takes awhile to transfer to metal. You just have to peel up a little bit of the edge of the transfer to see how you’re doing, and you can then place it back down and keep ironing until you have as much transferred as you want.   There’s usually a small ghost image remaining on the transfer paper, as with the tiles.